Business Central Manual Package Deployment
Microsoft has developed Business Central as an Enterprise Resource Planning (ERP) system. When we mention a Software as a Service (SaaS) deployment of Business Central, we are referring to a cloud-based deployment model. In this model, Microsoft hosts and manages the software on their servers, and users access it over the internet through a web browser. After completing the development and testing phases of your tenant customization, the crucial next step is deploying the extension, encapsulated in the .app file, to your customer’s tenant. To execute this successfully, sign-in as a user with the necessary permissions to access the Extension Management page on environment. The deployment process involves going to navigation, clicking Manage and selecting the “Upload Extension” action, allowing you to upload the extension for either the current or the subsequent version of the service.
Permission Required to Deploy Extension on Business Central Packages:
Microsoft does not categorize EXTEN. MGT. – ADMIN under specific permission sets. However, to install or uninstall extensions, you need to be part of the D365 Extension Mgt. user group or explicitly possess the EXTEN. MGT. – ADMIN permission set. (For earlier versions, having the D365 EXTENSION MGT permission set is necessary).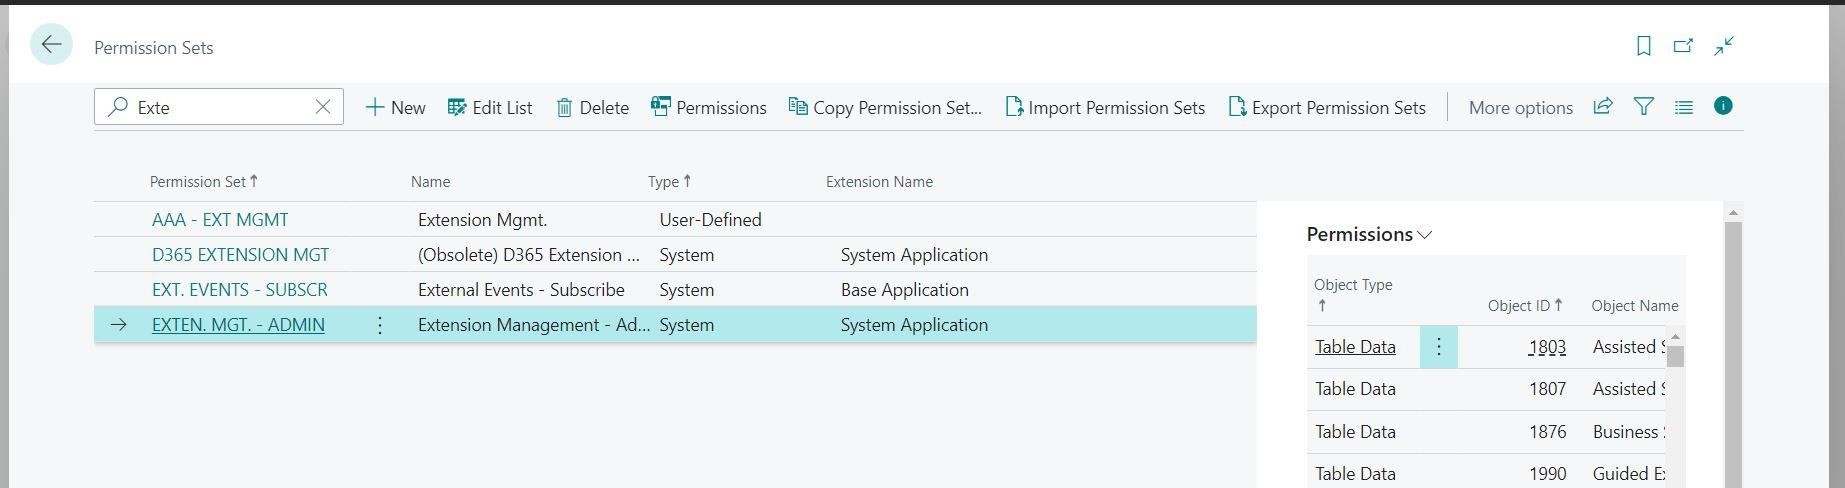
Fig-01
Business Central Package Deployment using Azure DevOps CI/CD
Creating a modern way to develop Microsoft Dynamics 365 Business Central with Azure DevOps is a smart choice. It helps to stay up-to-date, especially with the monthly changes in the SaaS world. However, it’s important to note that there isn’t a standard way to set up Azure DevOps, and there’s no built-in process for continuous integration and deployment. We can make it easy to deploy the Business Central package using CI/CD. We will start with Microsoft Business Central Automation APIs that allow us to automate the setup of companies through APIs. Once the tenants are created, we can use the automation APIs to set up the tenant as needed. This typically involves creating a new company, installing extensions, adding users to user groups, and assigning permission sets to users. These APIs can be accessed by delegated admin credentials and Business Central users who have the necessary permissions. Automation APIs are placed in the microsoft/automation API namespace.
To initiate the use of Automation APIs for Package deployment through CI/CD, certain initial configurations are required:
- Activate OAuth 2.0 for Microsoft Dynamics 365 Business Central.
- Create New App E.g. “Folio3BusinessCentralApp”.
- Grant API Permissions.
- Create Client Secret keys.
- Getting Keys for Token API calls.
- Register the Azure Active Directory in Dynamics 365 Business Central.
- Call OAuth 2.0 Token API from Postman.
- Employ Automation APIs.
- Set up the Azure DevOps Project for CI/CD.
PowerShell Scripts for Release Pipeline Tasks.
1. Activate OAuth 2.0 for Microsoft Dynamics 365 Business Central
For Dynamics 365 Business Central environments, the use of Basic Authentication (Web Service Access Key) is no longer supported, and users must switch to OAuth. I will provide a detailed walkthrough on how to configure OAuth for Dynamics 365 Business Central on-cloud.
Note: You can skip the steps which you have done earlier.
1. Create New App E.g. “Folio3BusinessCentralApp”
- Login to Azure portal with the same Business Central ID.
- Search “App Registration”.
- On App Registration select “New registration”.
- Enter the Name of the application e.g “Folio3BusinessCentralApp”.
- Choose who can use this app or access the API. We should select a single tenant.
- For Redirect URL, choose Web and add the Business Central URL “https://businesscentral.dynamics.com/”.
- Click on “Register“.
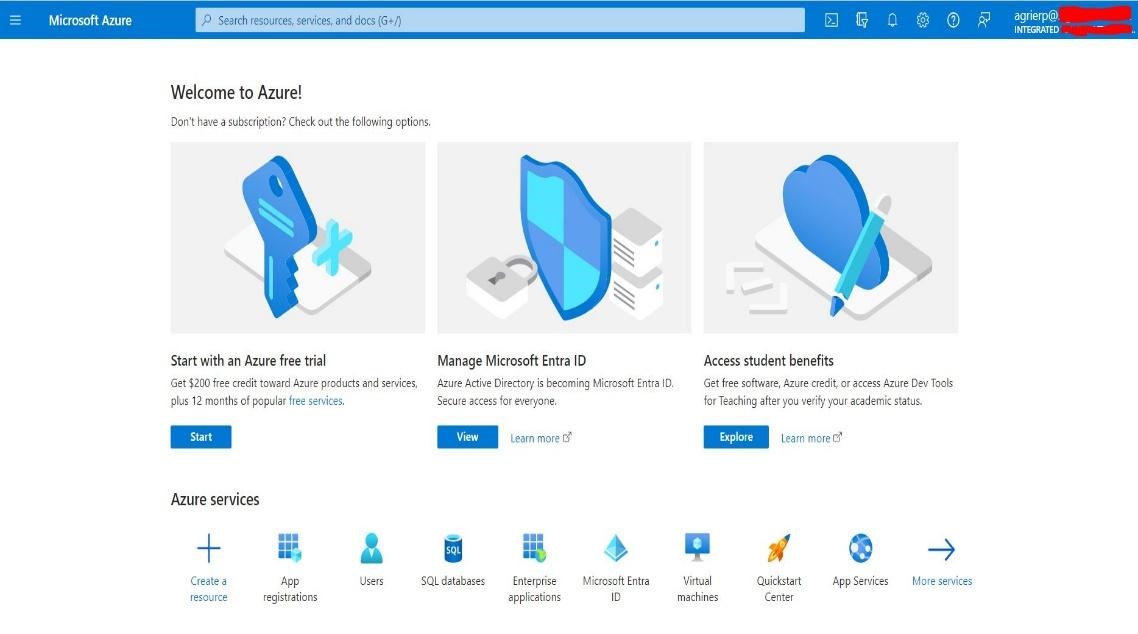
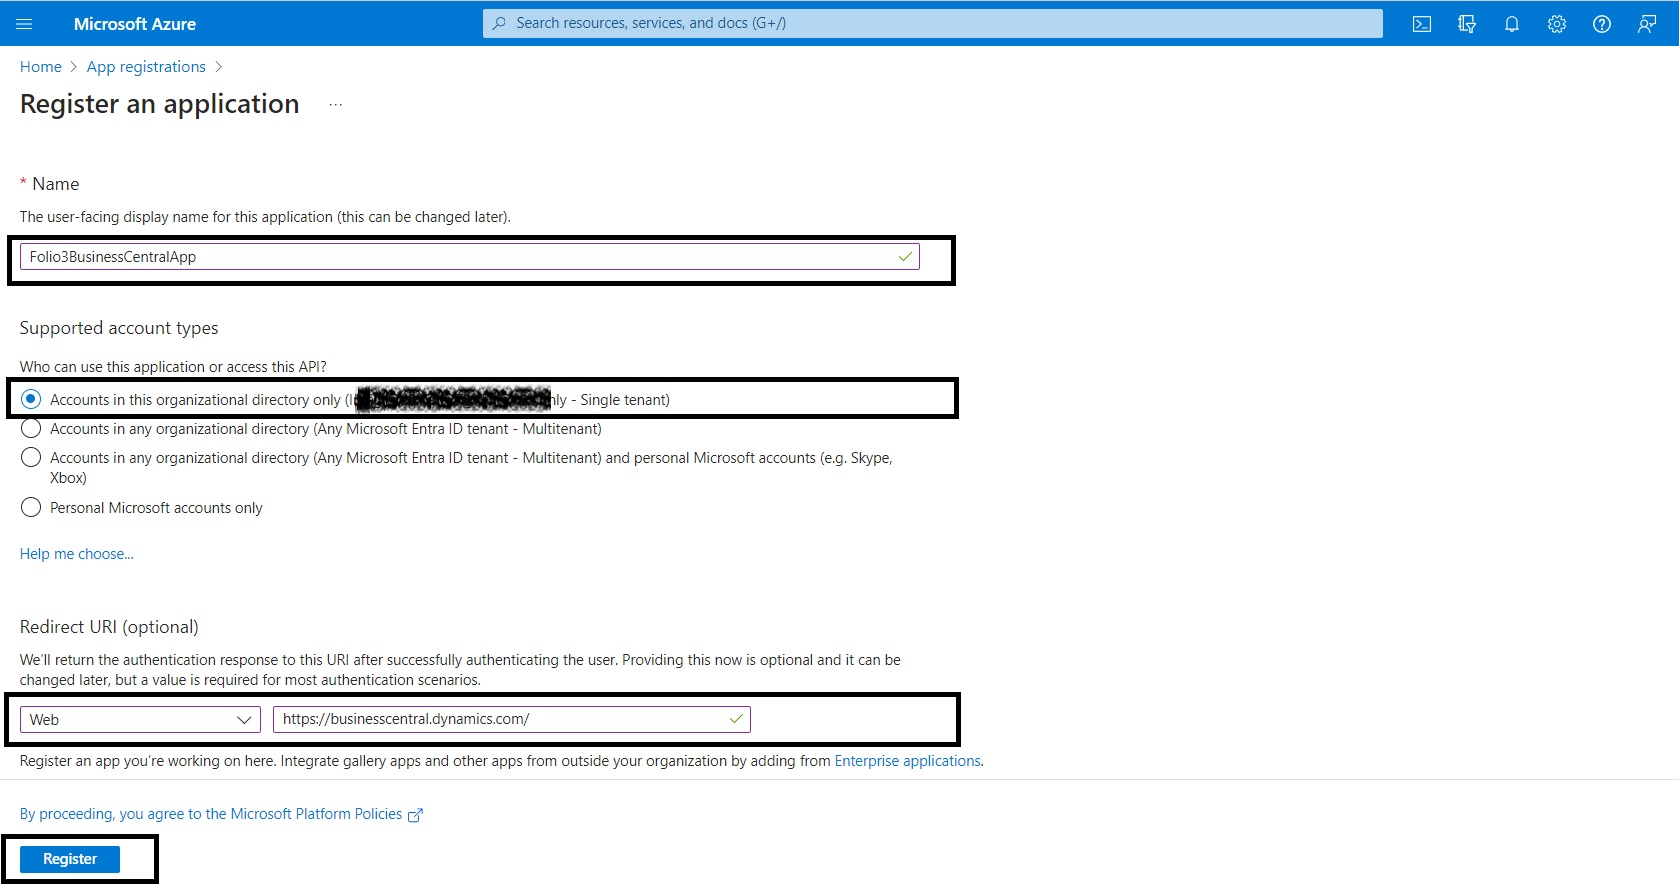
Fig-02
2. Grant API Permission
-
- Open the new created app. So, we need to grant the API permission. Click on “API permission” on the menu and then click “+ Add a permission”.
- After clicking “+ Add a permission”, the available API permissions will come up. Select “Business Central” (If you can’t see Business Central, it is because the user doesn’t have a valid license).

Fig-03
- Click “Delegated Permissions”, check “user_impersonation” & “Financials.ReadWrite.All”

- Now Click On “Application permissions”.
(1) In Other permissions check “app_access”.
(2) In the API check “API.ReadWrite.All”.
(3) In Automation check “Automation.ReadWrite.All”.
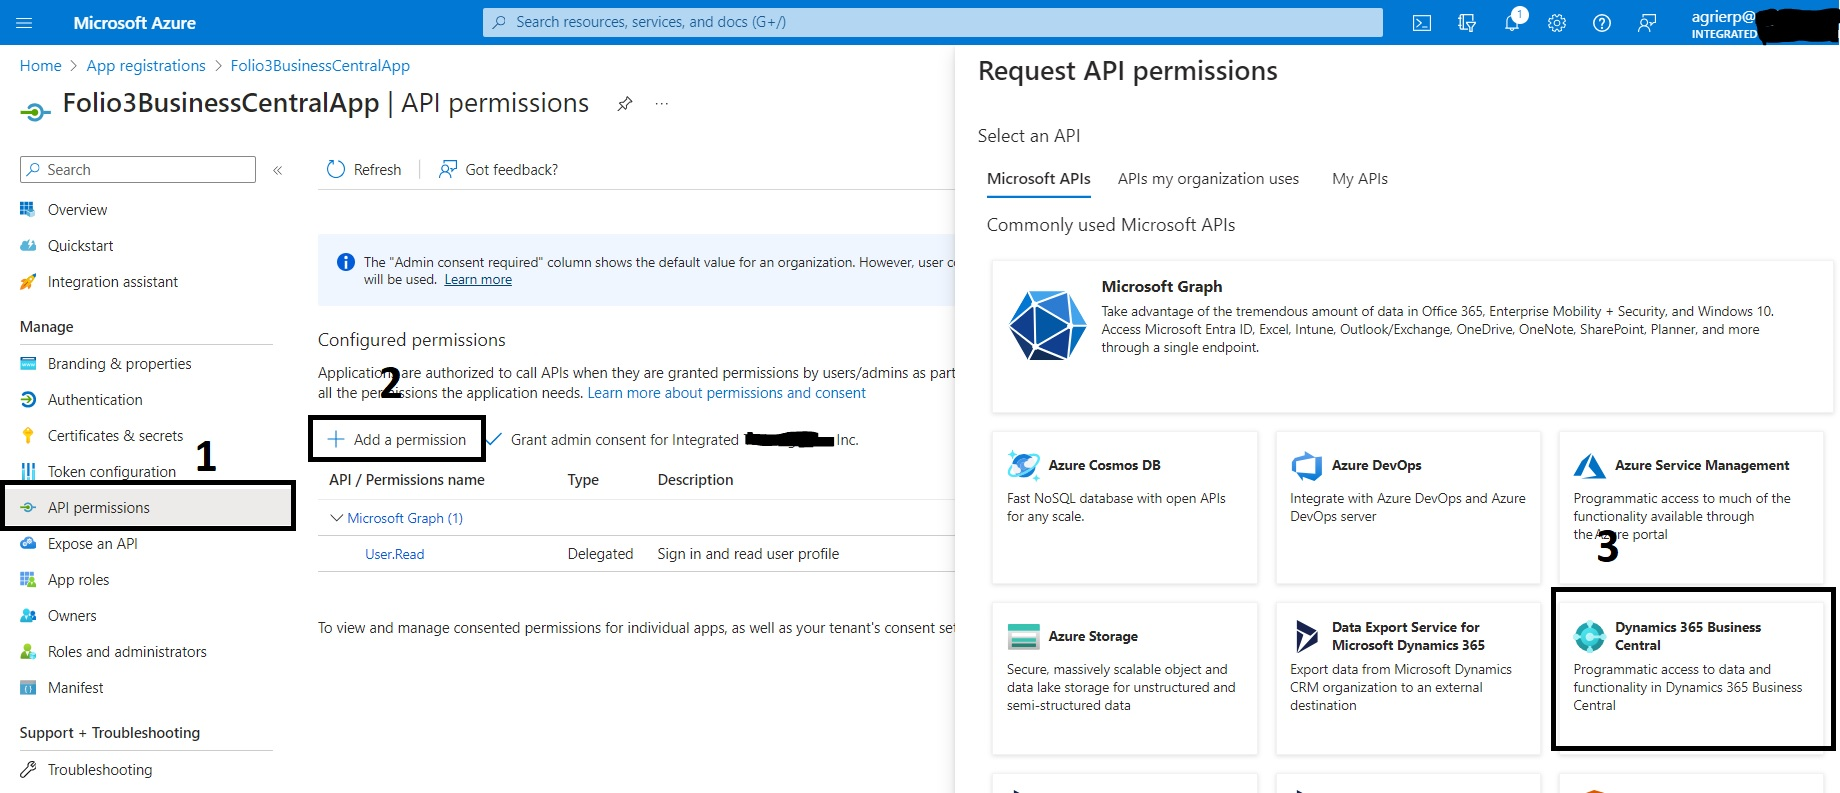
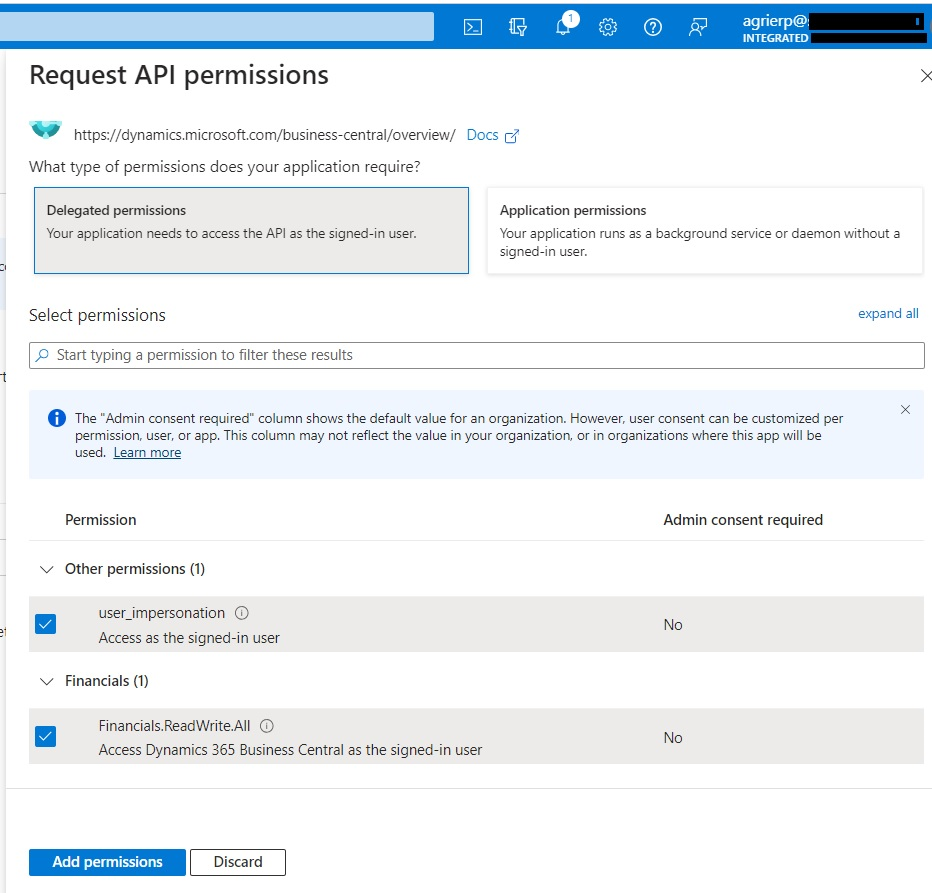
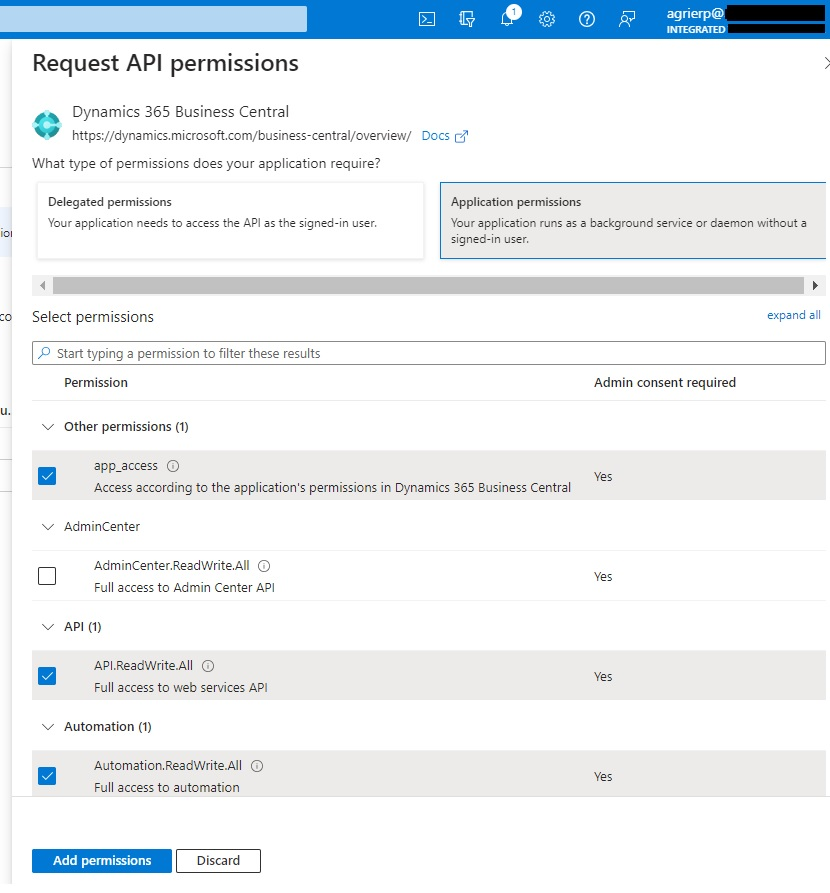
Fig-04
After adding permissions, we will redirect back to the API permissions. All we need to do here is click on “Grant admin consent for Integrated ******“.
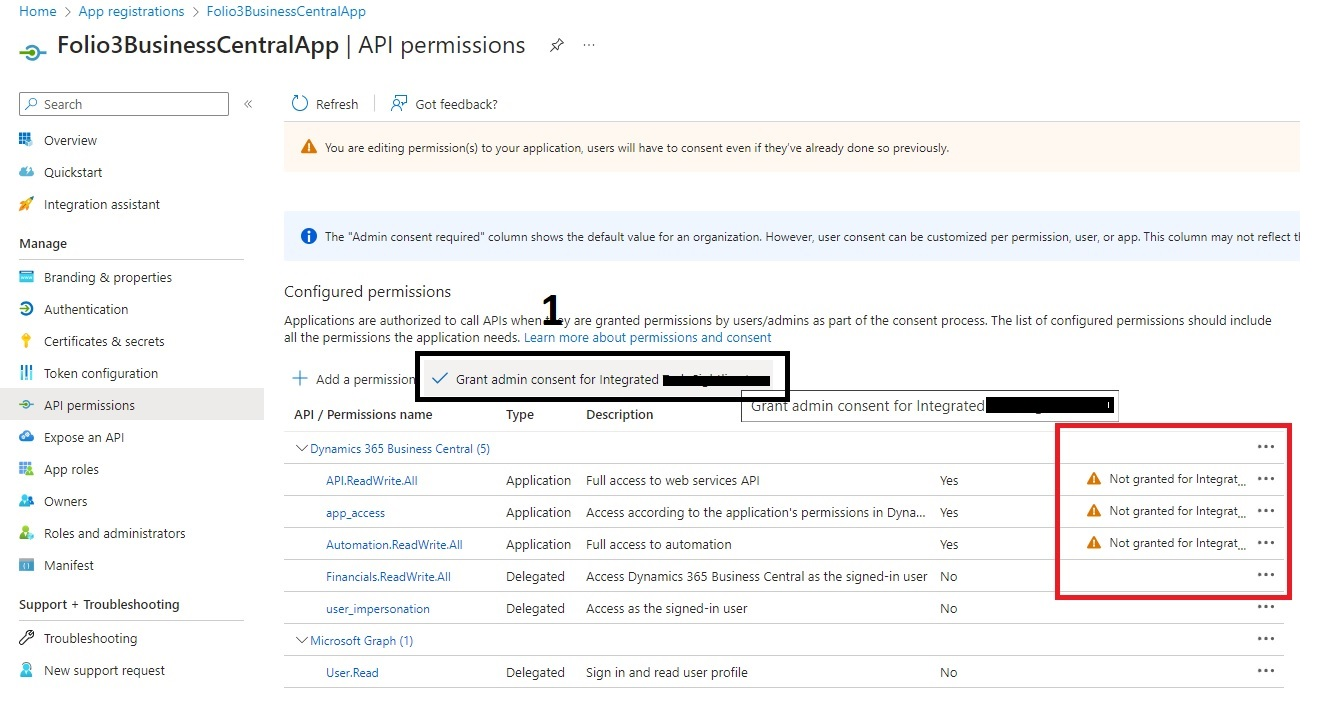
Fig-05
Click on “Yes” to grant admin consent for Integrated ****. and Status will update and turns to green
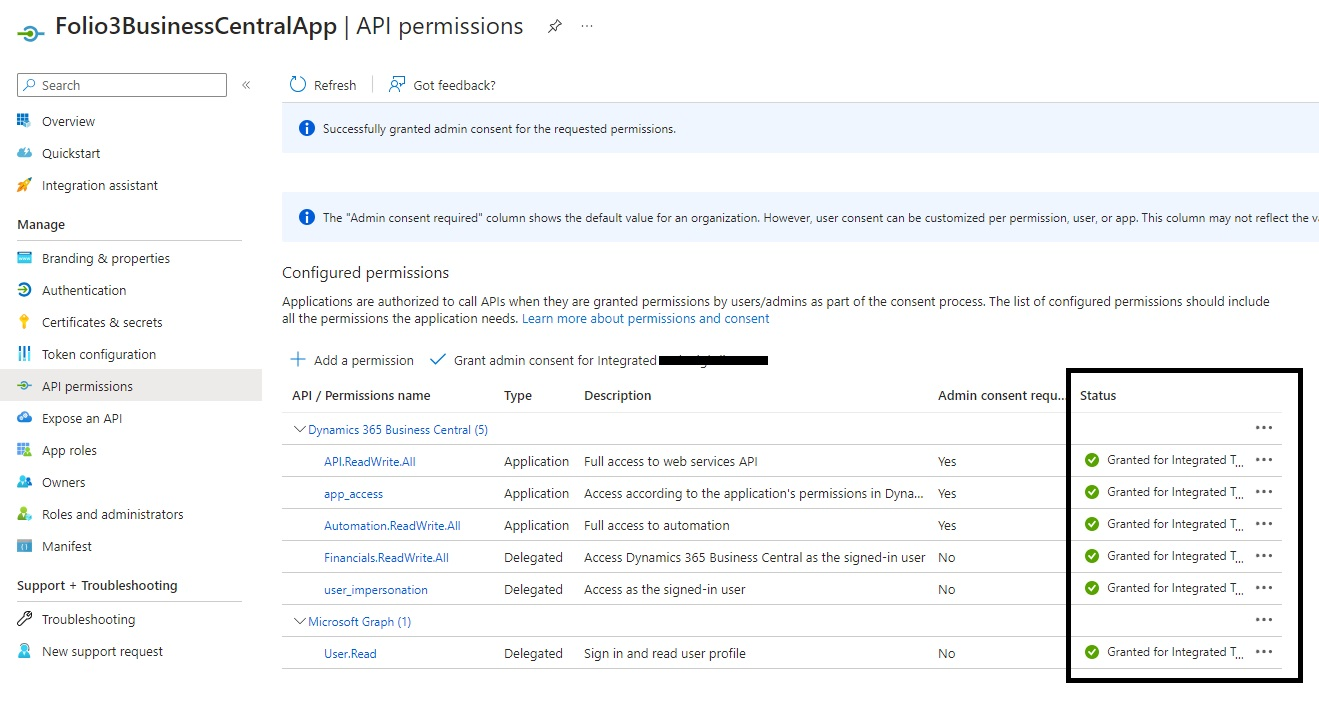
Fig-06
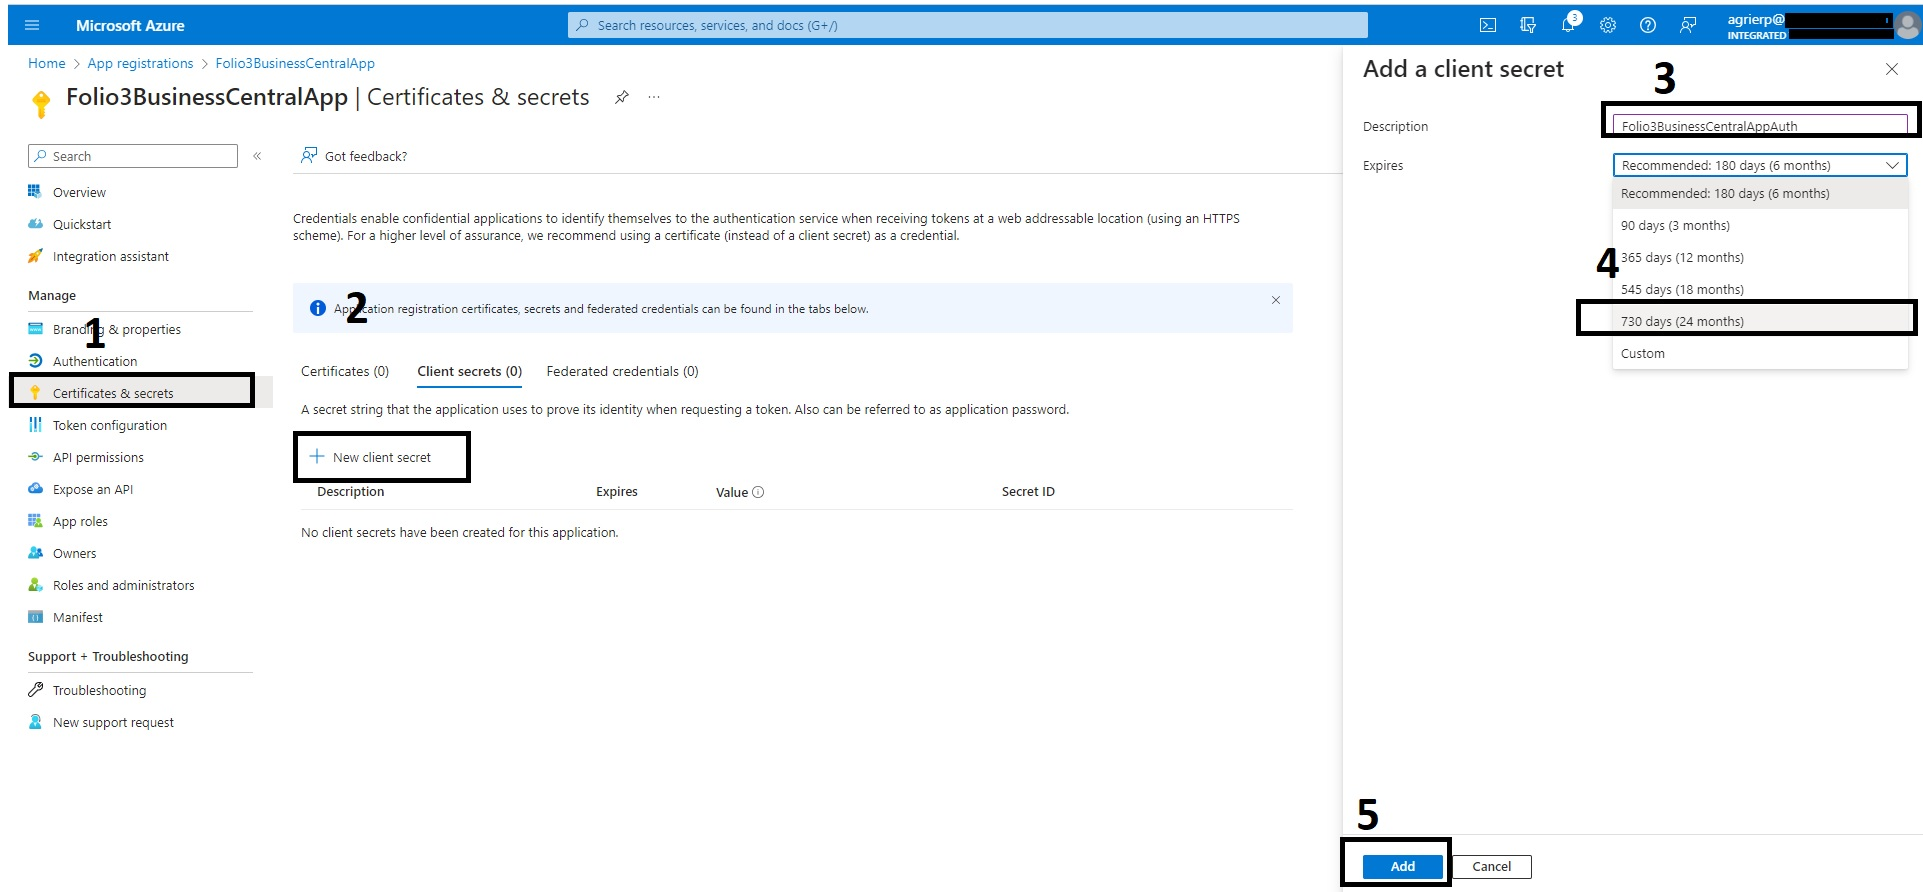
3. Create Client Secret
- Next, we have to create a new client secret. Click on “Certificate & secret” in the menu and click on “New client secret”. This step is important because they create the new key to pass the authentication. The key created is used as “client_secret” for OAuth, which is the new way to authenticate. (remember this client_secret for later use).
- Enter client secret description e.g. “Folio3BusinessCentralAuth” and assign when it expires (for now select for 24 months). Click the “add” button.

Fig-07
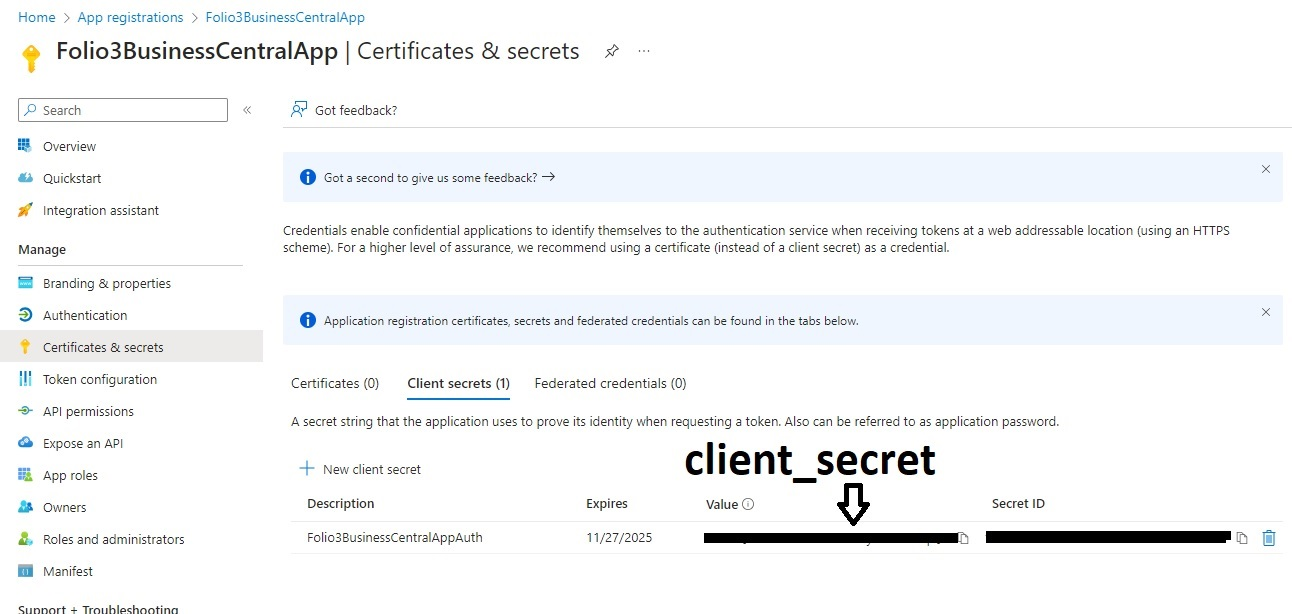
- Copy and save the value as client secret as shown in the below screenshot Before the page gets refreshed or you close the page.

Fig-08
- Click on the Overview Note the Application (client) ID as client_id and Directory (tenant) ID as tenant_id. We need this for token generation.

Now you have got three keys. client_secret, client_id and tenant_id
2. Register the Azure Active Directory in Dynamics 365 Business Central
If you have Dynamics 365 BC connected to another system using (S2S) authentication that needs Client Credentials OAuth 2.0, you have to register Azure Active Directory (AAD) Applications in Business Central. This section will show you how to do that.Here D365 Automation entitlements provide access to APIs through the” /api/microsoft/automation” route using OAuth client credentials flow. To access Business Central Automation APIs, you require a token with the “Automation.ReadWrite.All” scope. We have added in the API permissions section.
For service-to-service authentication setup, you need to:
Login to Azure Portal, go to the App registration and select the app we created previously “Folio3BusinessCentralApp”. Click the Authentication on the menu and then in Web Redirect URI add
“https://businesscentral.dynamics.com/OAuthLanding.htm”. In the end select the account and Save.
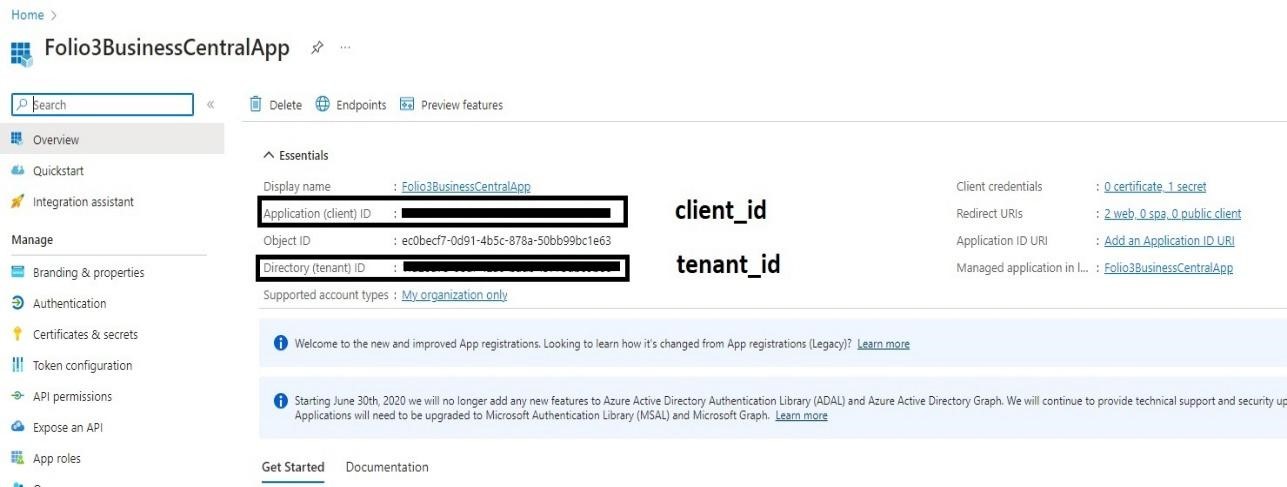
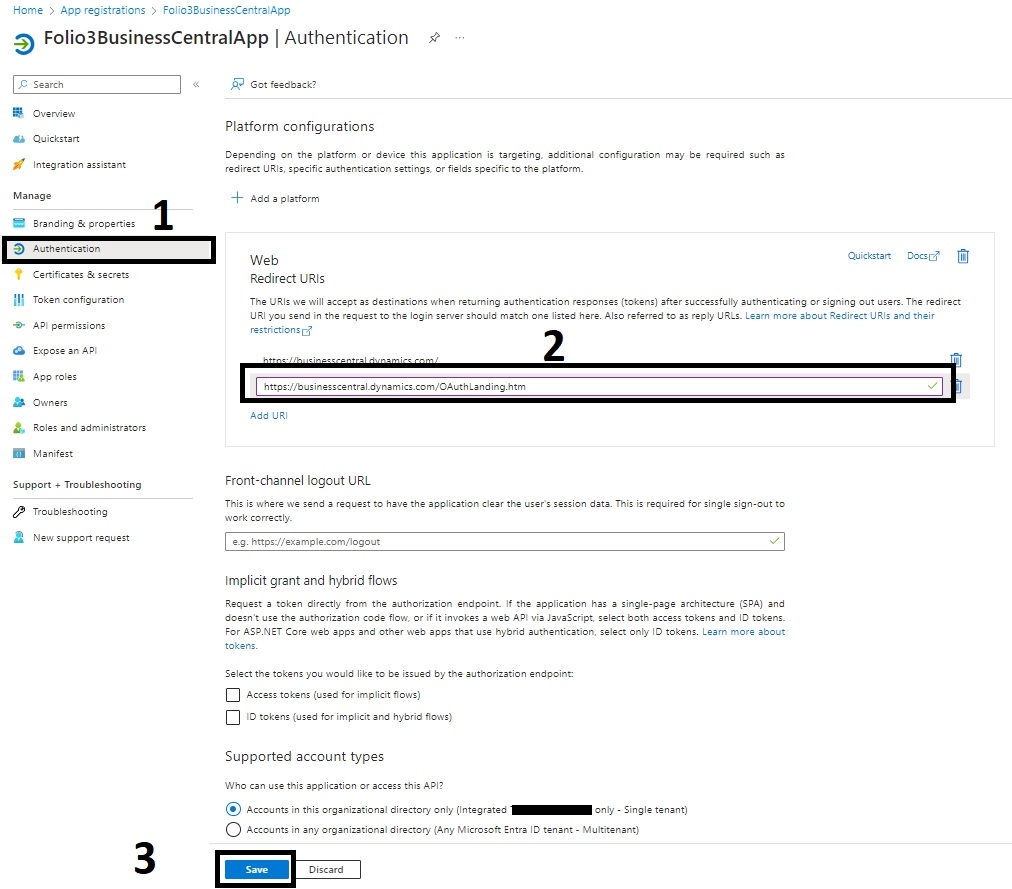
Fig-09
Now provide access permissions for that application in Business Central.
Note: You can only add a new entry in “Azure Active Directory Applications” if the logged in user is SUPER user or has “SECURITY” permission, the reason is that only those users will be able to Grant consent to new registration here.
In Business Central, search “AAD”. Go to “Azure Active Directory Applications” and add a new application. Copy the client_id and paste it to the Client ID field in Business Central. Add Azure Portal’s app registration app name here (not mandatory to be the same but a good way for reference) in the description, the system will add the user ID and user name automatically.
Also, add the user groups, “D365 ADMINISTRATOR” & “D365 BUS FULL ACCESS”.
Click “Grant Consent” and enter the Credentials username and password to accept the permission requested.
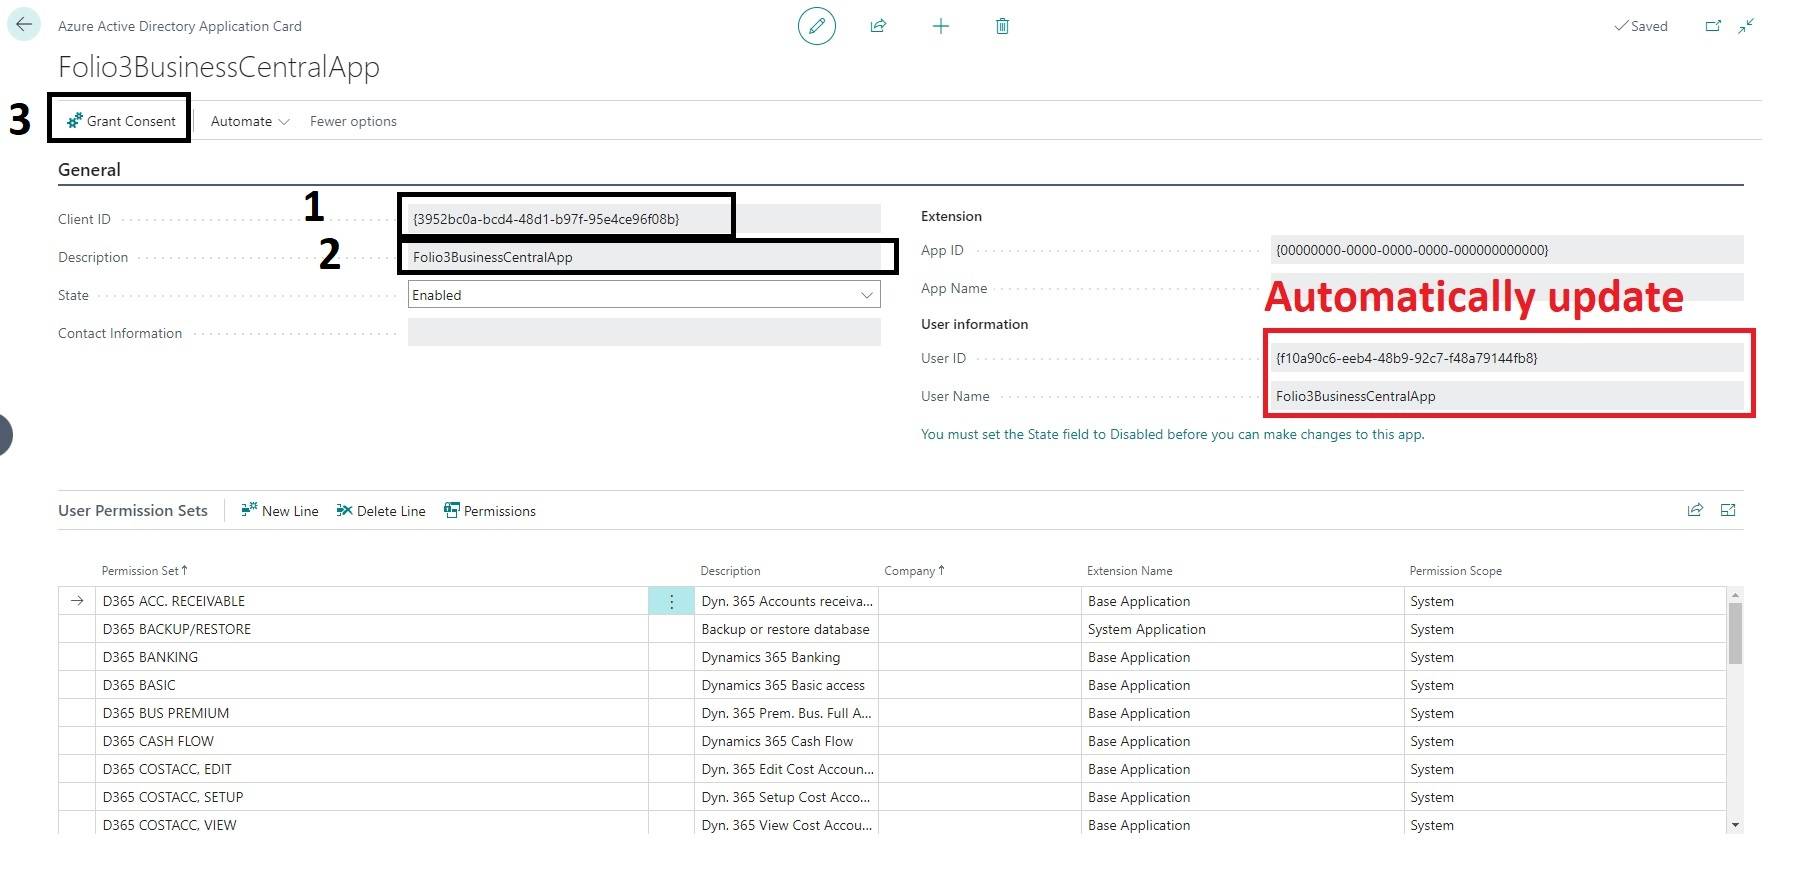
Fig-10
3. Call OAuth 2.0 Token API from Postman.
- In Postman, create a collection and add a request named “GetToken“.
- Set the request method to Post and paste the URL “https://login.microsoftonline.com/{tenant_id}/oauth2/v2.0/token” into the URL field. Replace {tenant_id} with your actual tenant ID.
- In the Body section, choose the “x-www-form-urlencoded” radio button.
- Add the following parameters:
- client_id: Use the client ID obtained from the Overview section as the Application (client) ID.
- client_secret: Use the client secret obtained in the Create Client Secret section.
- scope: Set it to “https://api.businesscentral.dynamics.com/.default.”
- grant_type: Set it to “client_credentials.”
- Click “Send,” and you will receive a response with a status of 200 OK, containing the token in the access_token key of the JSON response.
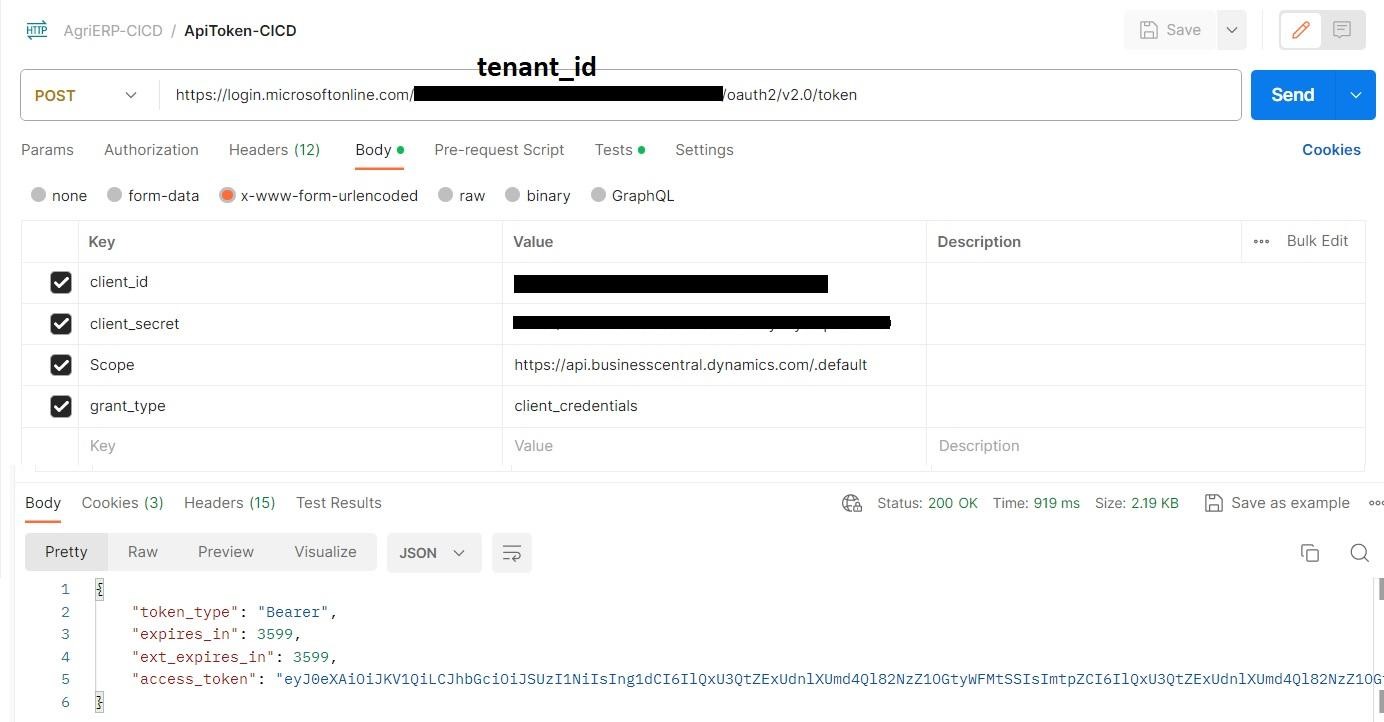
Fig-11
4. Automation API for Successful Loading and Installation of Package
Automation APIs Prerequisites
Endpoints for the Automation APIs: https://api.businesscentral.dynamics.com/v2.0/{Tenant_Id}/{environment_name}/api/microsoft/automation/v2.0/
For Example: My test environment
Tenant ID (user domain name): 1fxxxxxx-xxxx-xxxx-xxxx-xxxxxxxxxb86
Environment name: AgriERP_QA
Endpoints: https://api.businesscentral.dynamics.com/v2.0/1fxxxxxx-xxxx-xxxx-xxxx- xxxxxxxxxb86/AgriERP/api/microsoft/automation/v2.0/
For company Id:
Search “Companies” in Business Central, when the page is completely loaded then press Ctrl +Alt + F1, this will open business central inspect page search id, Copy the Id as Company Id.
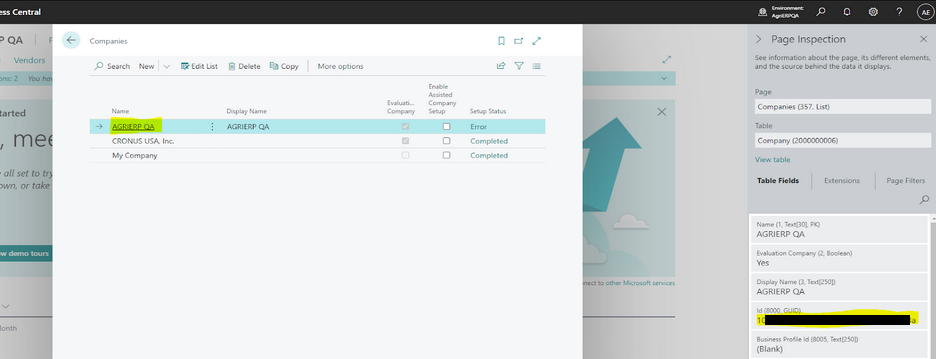
Now we have tenant Id, company id and environment name which we will use in automation Api’s to call respective API.
After thorough research, I successfully decoded some key insights for you. Microsoft specifies the need for three requests to be sent to the automation API for the successful loading of your extension into Business Central (POST, PATCH, POST). The English names for these three requests are “Insert Extension Upload”, “Upload Extension File,” and “Install Extension.”
- Insert Extension Upload
- Upload Extension File
- Install Extension
- Check Extension Status
Insert Extension Upload
Creates an extension upload in Dynamics 365 Business Central.
| Method | POST |
| URL | https://api.businesscentral.dynamics.com/v2.0/{tenant_Id}/{env_name}/api/microsoft/automation/v2.0/companies({companyId})/extensionUpload |
| Authorization | Bearer {token} |
| Content-Type | application/json |
| Body | {
“schedule”: “Current version”, “schemaSyncMode”: “Add” } |
| Response | Http Status 200 OK { “@odata.context”: “https://api.businesscentral.dynamics.com/v2.0/{tenant_id}/{env_name}/api/microsoft/automation/v2.0/$metadata#companies({comp_id})/extensionUpload”,”value”: [ {“@odata.etag”: “W/\”JzIwOzE1NjYyMzUyODE0NTExNjk3MDI2MTswMDsn\””,”systemId”: “b1******-7184-ee11-817a-00******3948″,”schedule”: “Current_x0020_version”,”schemaSyncMode”: “Add”,”[email protected]”: “https://api.businesscentral.dynamics.com/v2.0/{tenant_id}/AgriERP/api/microsoft/automation/v2.0/companies({comp_id})/extensionUpload(b1******-7184-ee11-817a-00******3948)/extensionContent”,”[email protected]”: “https://api.businesscentral.dynamics.com/v2.0/{tenant_id}/AgriERP/api/microsoft/automation/v2.0/companies({comp_id})/extensionUpload(b1******-7184-ee11-817a-00******3948)/extensionContent”}]} |
The initial request (POST) notifies table 5447 that a new extension is in the process of being uploaded. Typically, this table holds just one record at a time and won’t pose further concerns once all three API steps for publishing an extension are finished. Attempting to make a second POST request before completing all three steps will not be possible. The actual response from the first POST call can only be obtained by using the same API with the Get method.
The response from the first POST Request is crucial. It includes a value called “System ID” which essentially serves as your “Package ID/ExtensionUploadId“. Utilize this System ID/Package ID in your subsequent PATCH request, specifically in the “extensionUploadId” parameter at “Upload Extension File” request. You’re now all set. You have the “extensionUploadId/Package ID” for the extension even before it is officially published.
Upload Extension File
Modifies the attributes of an extension upload entity in Dynamics 365 Business Central.
| Method | PATCH |
| URL | https://api.businesscentral.dynamics.com/v2.0/{tenant_Id}/{env_name}/api/microsoft/automation/v2.0/companies({companyId})/extensionUpload({extensionUploadId})/extensionContent |
| Headers | {
“Content-Type”: “application/octet-stream”, “Authorization”: “Bearer $token”, “If-Match”: “*”, } |
| Body | Binary Upload File |
| Response | If successful, this method returns a 204 No Content. |
Install and Uninstall Published Add-on Extensions
Three bound actions, namely “Microsoft.NAV.install”, “Microsoft.NAV.uninstall”, and “Microsoft.NAV.uninstallAndDeleteExtensionData” are accessible on the extension’s endpoint.
After uploading the extension file, initiate the installation process by executing a POST request on the bound action “Microsoft.NAV.upload”.
| Method | POST |
| URL | https://api.businesscentral.dynamics.com/v2.0/{tenant_Id}/{env_name}/api/microsoft/automation/v2.0/companies({companyId})/extensionUpload({extensionUploadId})/Microsoft.NAV.upload |
| Headers | {
“Authorization”: “Bearer token” } |
| Response | Http 200 OK |
Uninstalling the extension can be done through the bound action Microsoft.NAV.uninstall, as with the add-on extensions. The bound action Microsoft.NAV.uninstallAndDeleteExtensionData can be used to delete the tables that contain data owned by the extension on uninstall. This action cannot be undone.
Check Extension Status
Enlist the status of deployed extensions within Dynamics 365 Business Central. The Latest one will be the recent extension uploaded.
| Method | GET |
| URL | https://api.businesscentral.dynamics.com/v2.0/{tenant_Id}/{env_name}/api/microsoft/automation/v2.0/companies({companyId})/extensionDeploymentStatus |
| Headers | {
“Authorization”: “Bearer token” } |
| Response | “value”: [
{ “@odata.etag”: “W/\”JzIwOzEyMDc1NTg2NxxxxxxxxxM2NjE4MTswMDsn\””, “operationID”: “e3906540-8ad8-4ac6-8c7d-b104aa63f02f”, “name”: “F3AgriERPServices”, “publisher”: “Folio3”, “operationType”: “Upload”, “status”: “InProgress”, “schedule”: “Immediate”, “appVersion”: “2.0.1.47”, “startedOn”: “2023-11-22T08:02:20.22Z” }, …… |
In summary these are four steps for deploying, installing and checking the status of a package. Next, we will set up Azure DevOps, using our organization and selecting our respective project for deployment.
5.Set up the Azure DevOps Project for CI/CD.
Sign into https://aex.dev.azure.com/ Select your organization. Click on your project name e.g. “AgriERP **********”. Your project dashboard will be loaded. Now we are going to set up our project for doing business central deployment on customer tenant environments. Basically, we have two things: Continuous Integration and Continuous Deployment. In Continuous Integration we are doing our build related work and our build is only successful when our code is compiled and build properly. For that all we need to do is to bring a compiler and Al Packages on Azure DevOps so we can easily compile and build our code.
Pre-requisites:
AZURE CLI (Download from here!) or Go-to Official Site.
I typically obtain the compiler from the local service folder “C:\Program Files\Microsoft Dynamics 365 Business Central\220\Service” (refer fig-31) sourced from the installed Microsoft Business Central On-Premises version. Please delete all unnecessary folders (red highlighted in Fig-32) inside the service folder and rename it as “ALCompiler.” 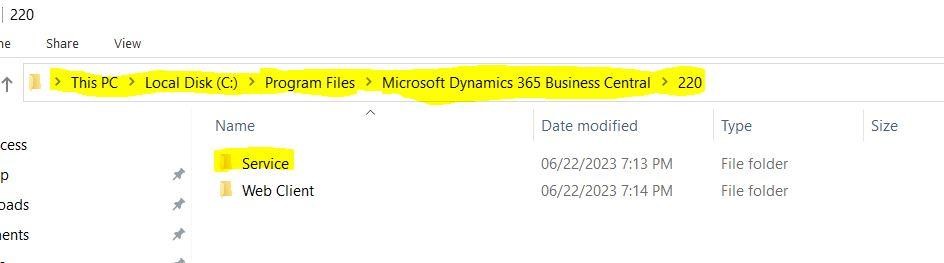
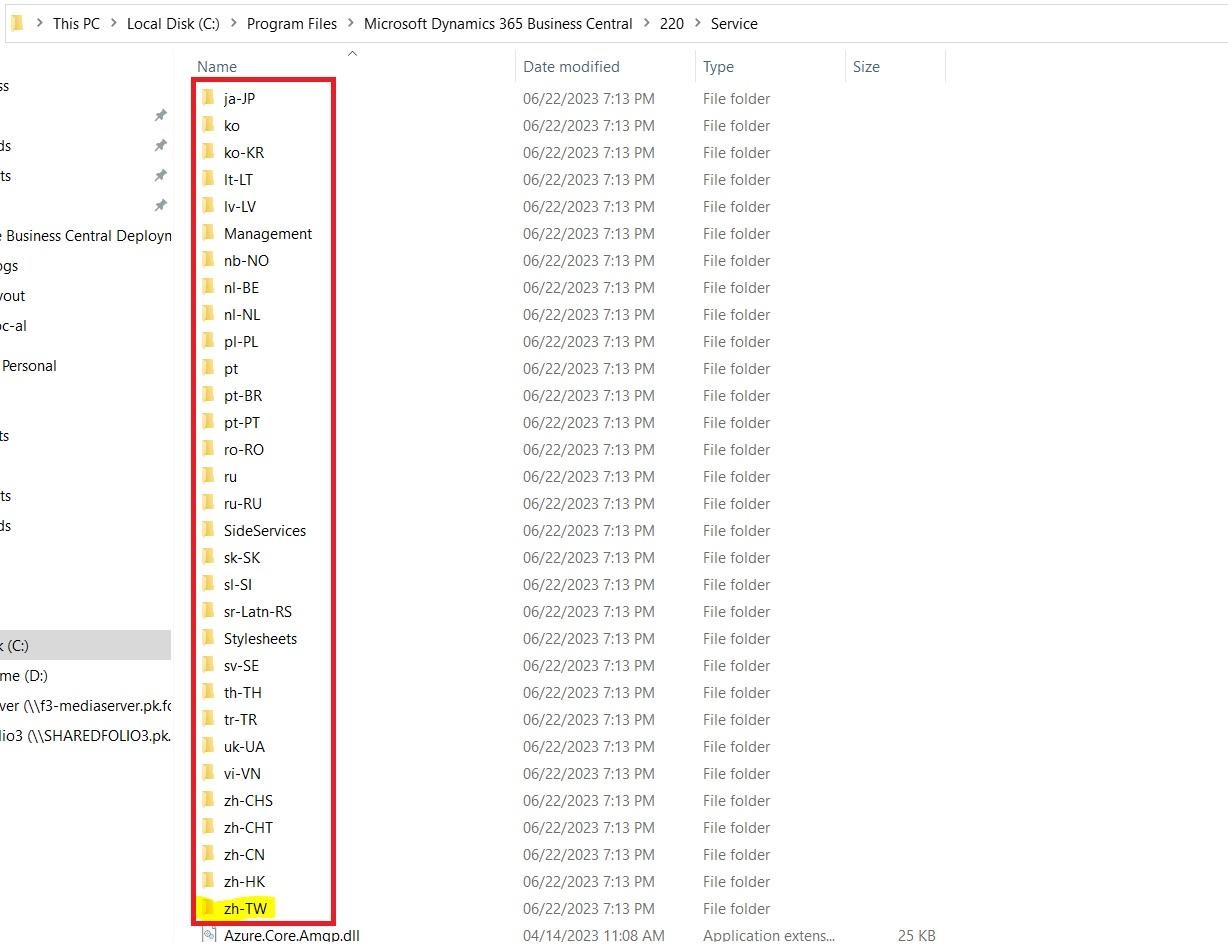
Fig-13
Now the ALCompiler folder looks like.
Fig-14
- Next, go to your project directory and select the .alpackage

Fig-15
Now we will upload these 2 folders to our project’s Artifacts. Go to your project on Azure DevOps in Menu click on Artifacts
1. Azure Artifacts Feed
Navigate to the feeds section on the left in your Azure DevOps Project. Click on Create Feed button

A panel from the left side will pop out, prompting for information about the feed. Input the Name e.g. AgriERPBC-AL_Package (for uploading ALCompiler folder) of the feed, Visibility and Scope and click on Create button
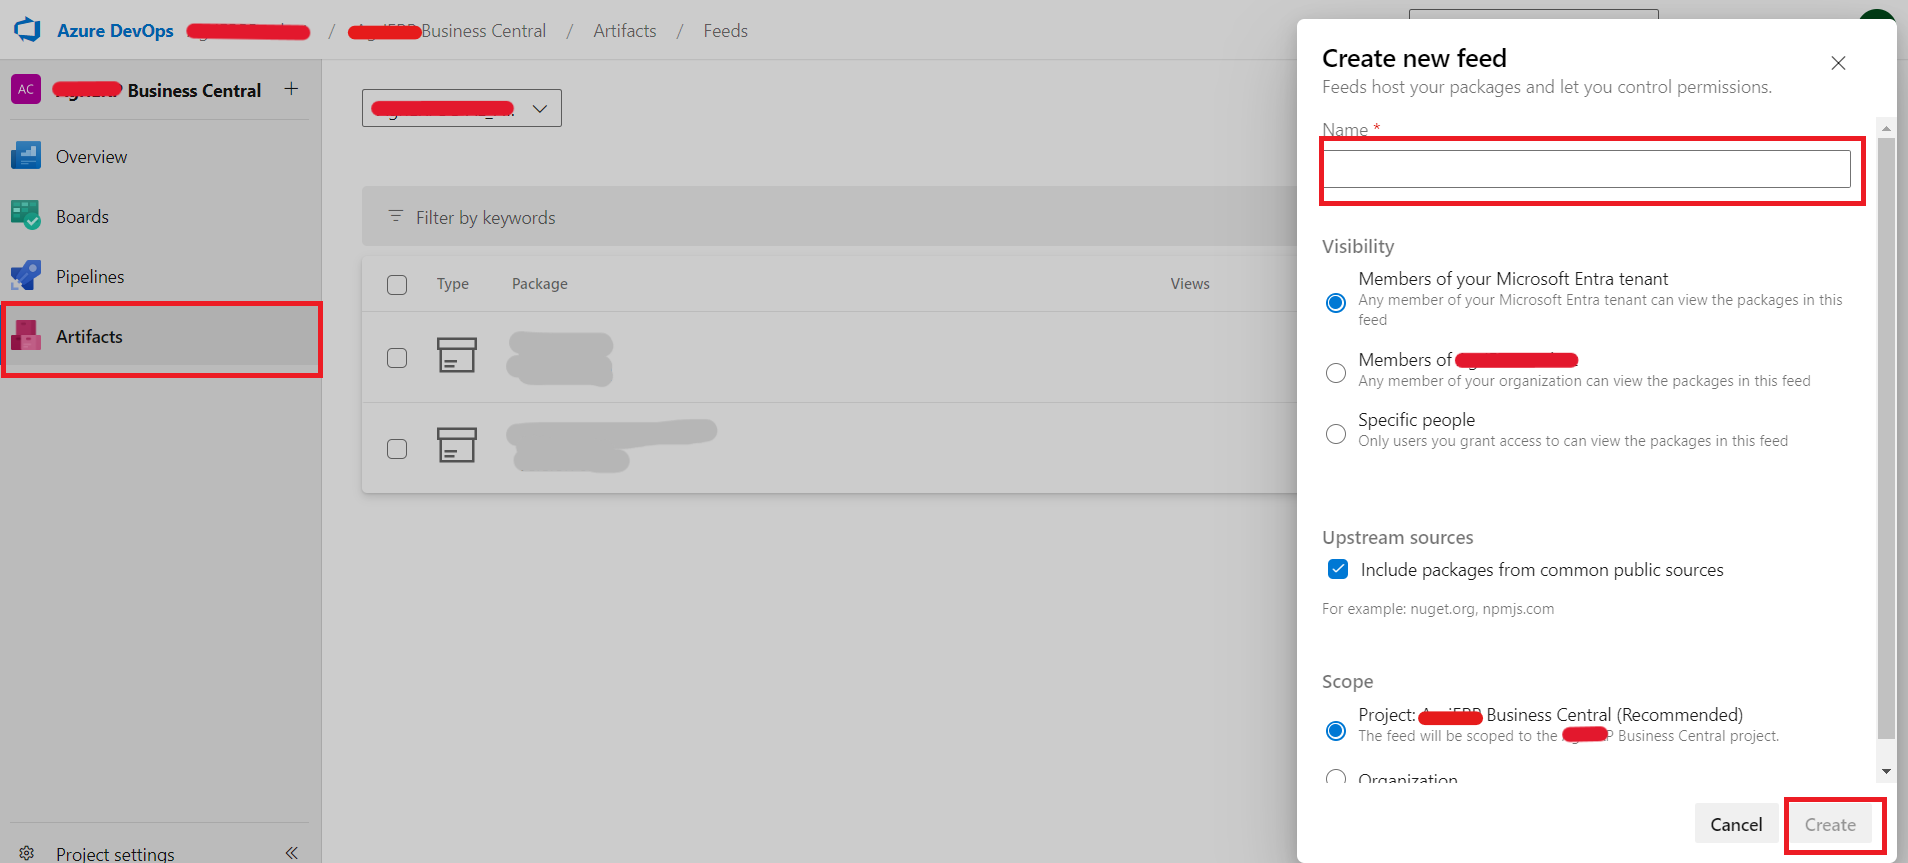
The feed will then be available in the Artifacts section in your Azure DevOps Project.
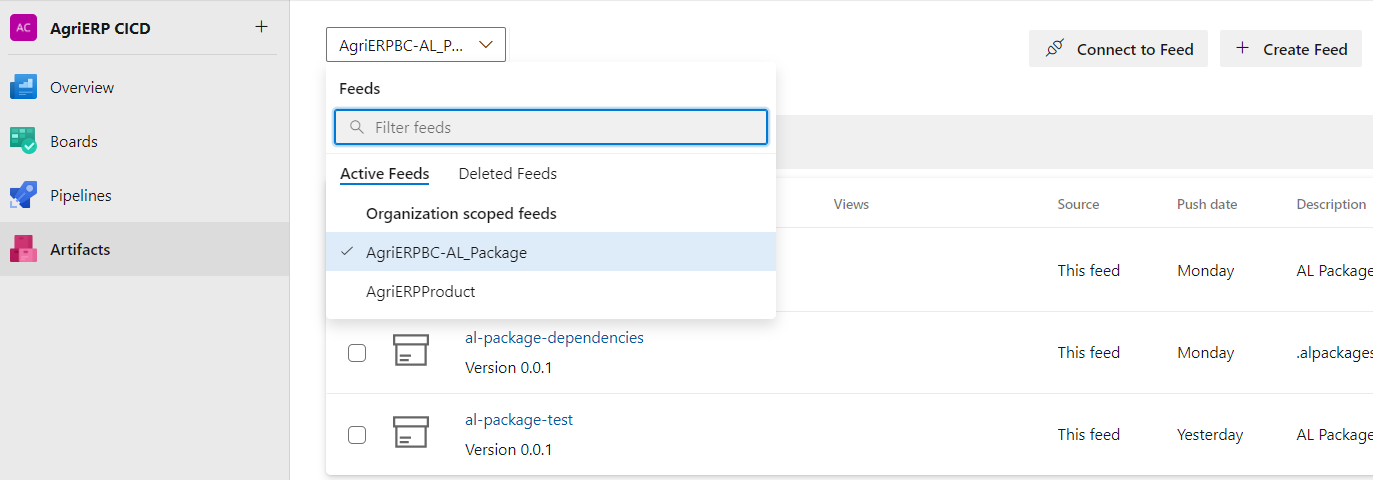
Next, in the Artifacts section, click on the Connect to Feed button, make sure that the feed that you just created is selected in the dropdown.
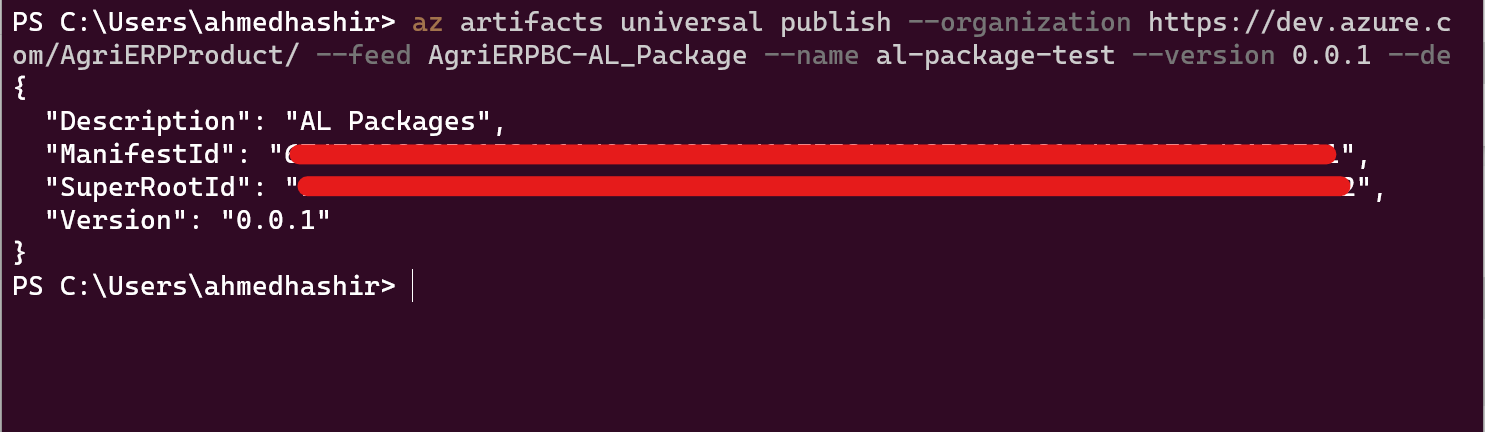
In the connect to feed section, scroll down and select the “Universal Packages” in the Universal section, because we will be bringing our own package. On Selecting “Universal Packages” a new section from the left will pop out, where you can find the PowerShell commands to publish your files to the azure feed. Go ahead and copy the “az artifacts universal publish….” command.
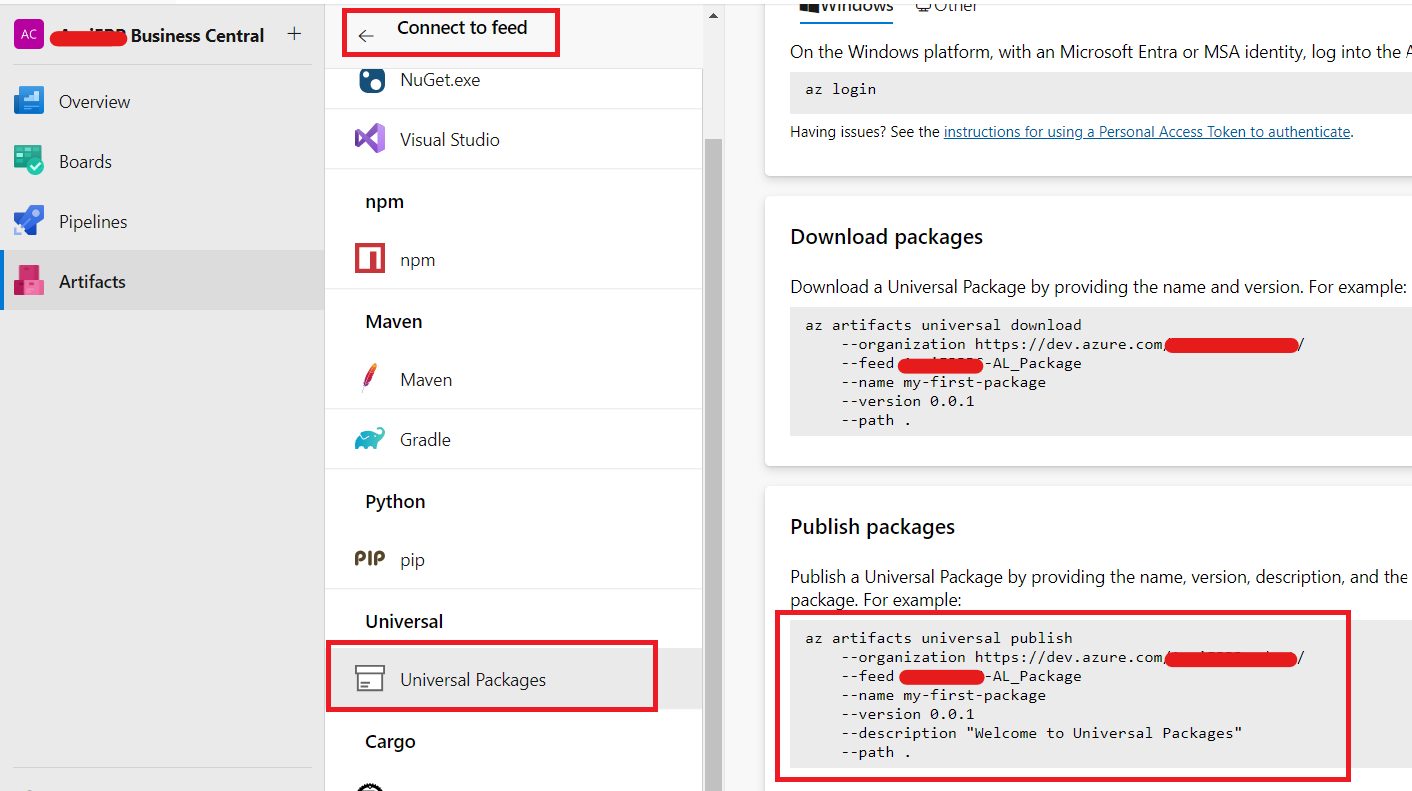
Open PowerShell on your local machine, and paste the “azure artifacts” command that you copied in the previous step.
(Make sure you have Azure CLI installed and are logged in PowerShell with your azure account that you’re using on azure DevOps portal, you can check account with “az account show” or login using “az login”)
You can set the “- -name”, “- -version” and “- -description” values according to your needs, and make sure to replace the “.” in the end of the command after – -path and use the path of “ALCompiler folder” that your package folder is present at after –path. The path will be to the inside of the package folder.
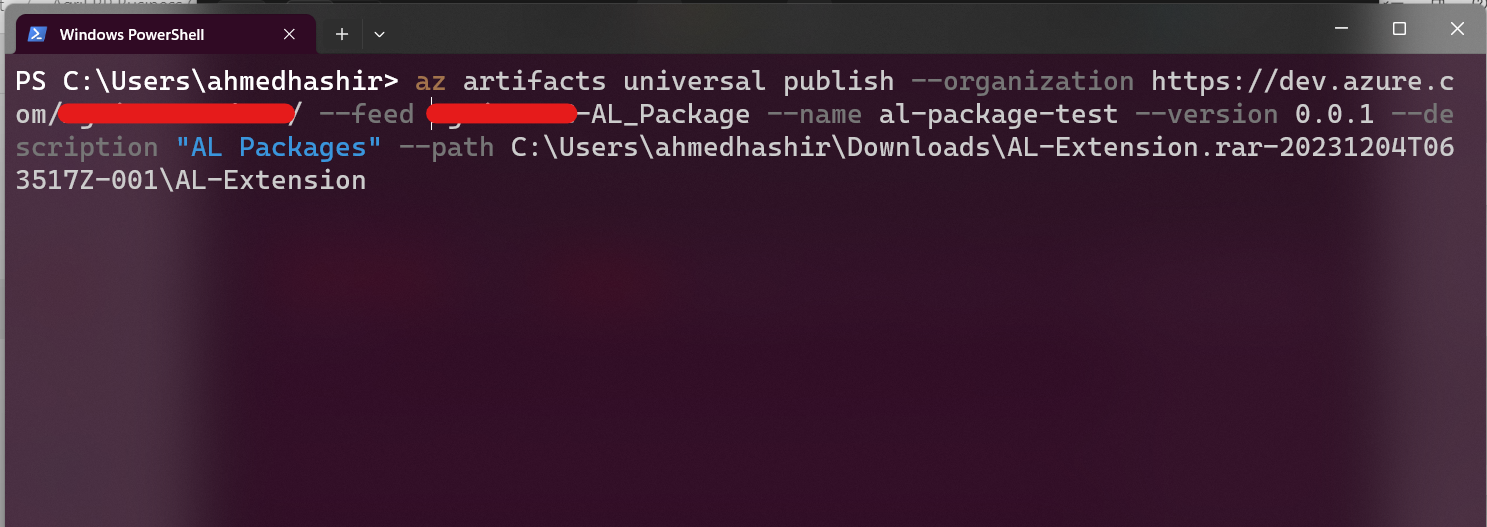
On successful publish, the output would look like this.
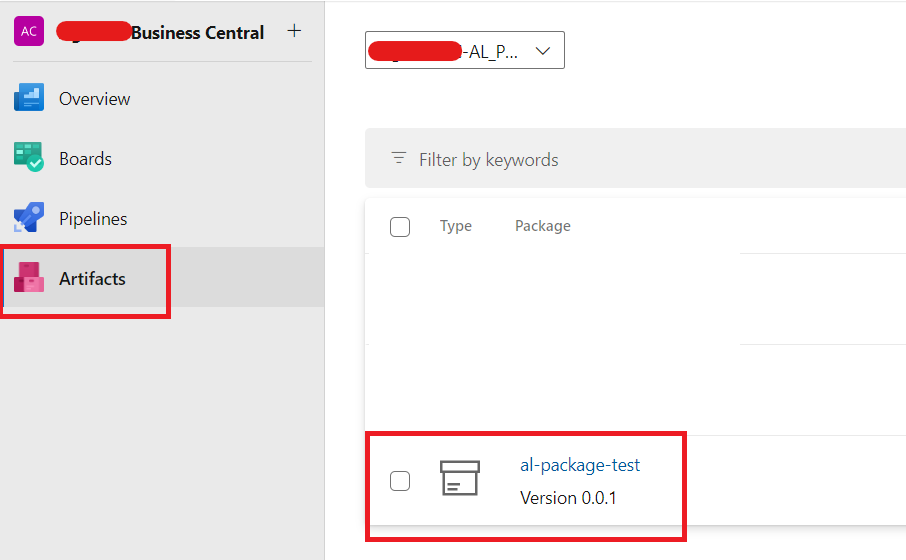
Go back to the “Artifacts” section on your Azure DevOps Project, and select your Feed. There, you can see the package that you uploaded in the previous step.
Repeat the same steps of package upload to your feed, and upload the .al-packages folder contents of your business central project (refer to step 2 and Fig-34 above), this will be used later to build your project in the Build Pipeline (CI).
2. Build Pipeline
In this section we will setup a build pipeline (CI). This pipeline will be responsible of building your Business Central project and generating a .app file, that we will deploy to BC Cloud.
Navigate to the Pipelines section from the menu on the right in your Azure DevOps Project, and click on the ![]() “New pipeline” button.
“New pipeline” button.
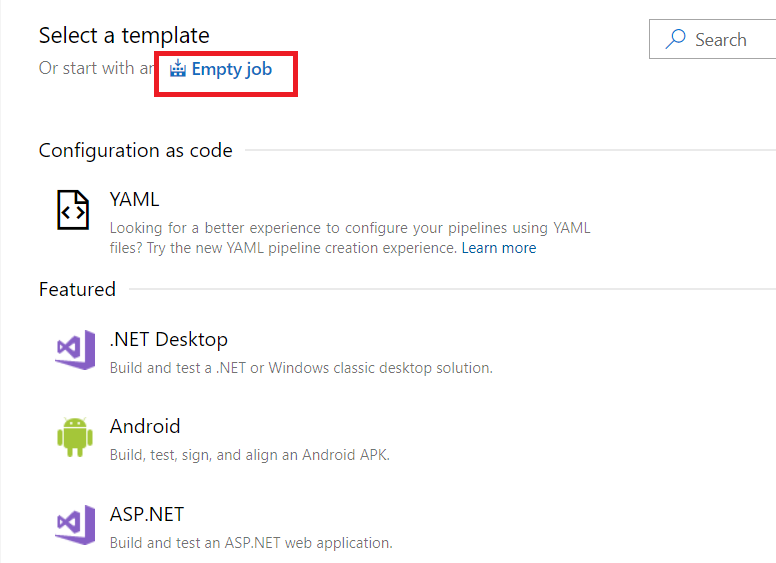
Here we will select the “use the classic Editor” Pipeline method to create a pipeline to skip yaml configuration. In the next menu that will open, select the “Empty job”.
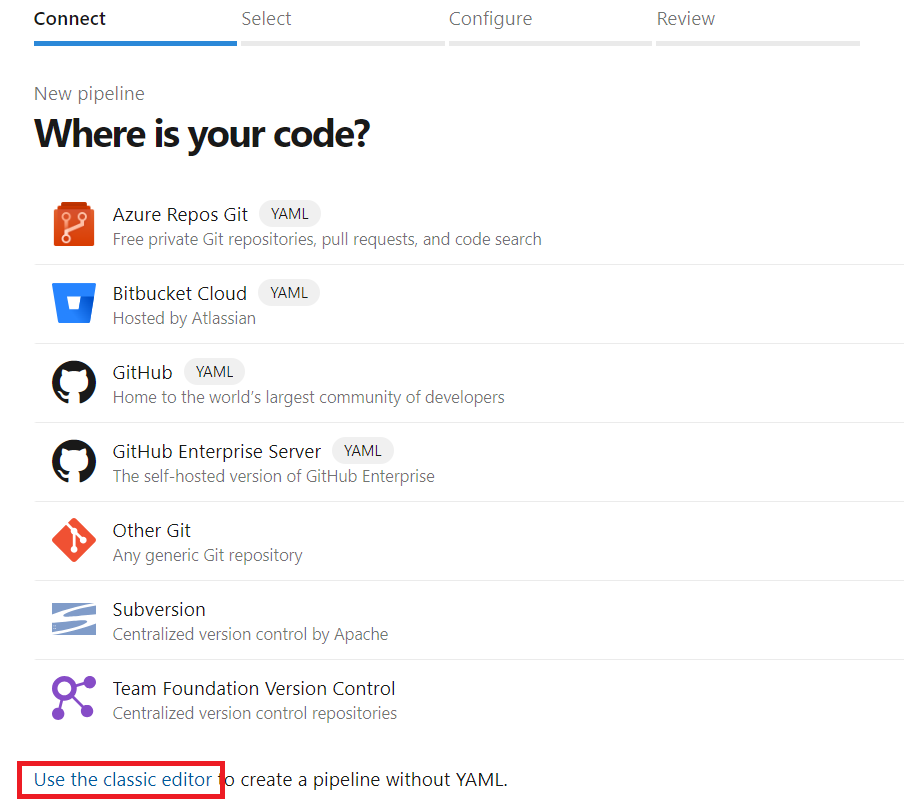
In this step, you will set the repository where your project code is present. The source control I am using is Bitbucket, so I will select that and choose the respective repository and branch, and click on “Continue”.
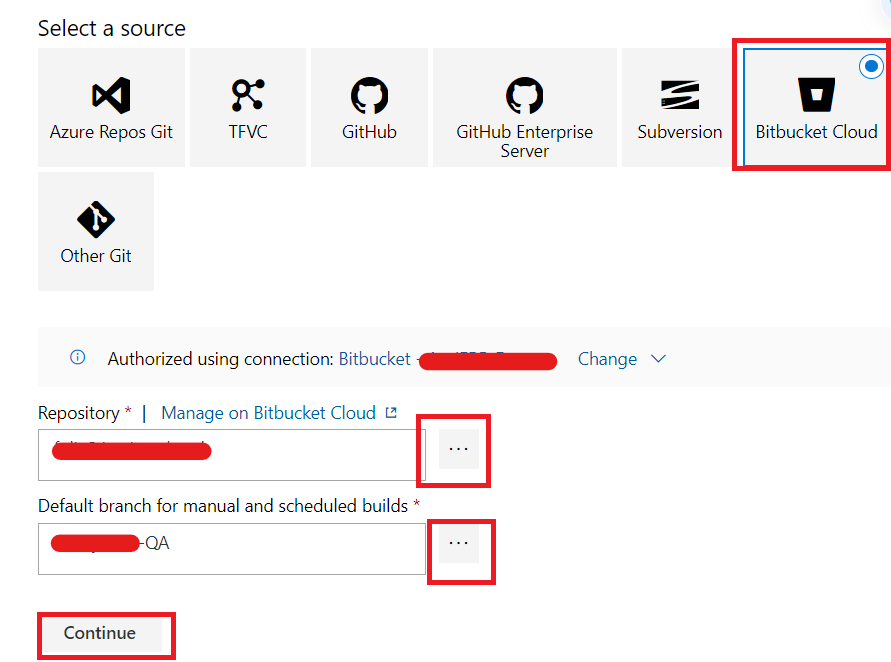
Note: By default, there is no connection made to any source control or repository, a service connection is required to connect to any repository.
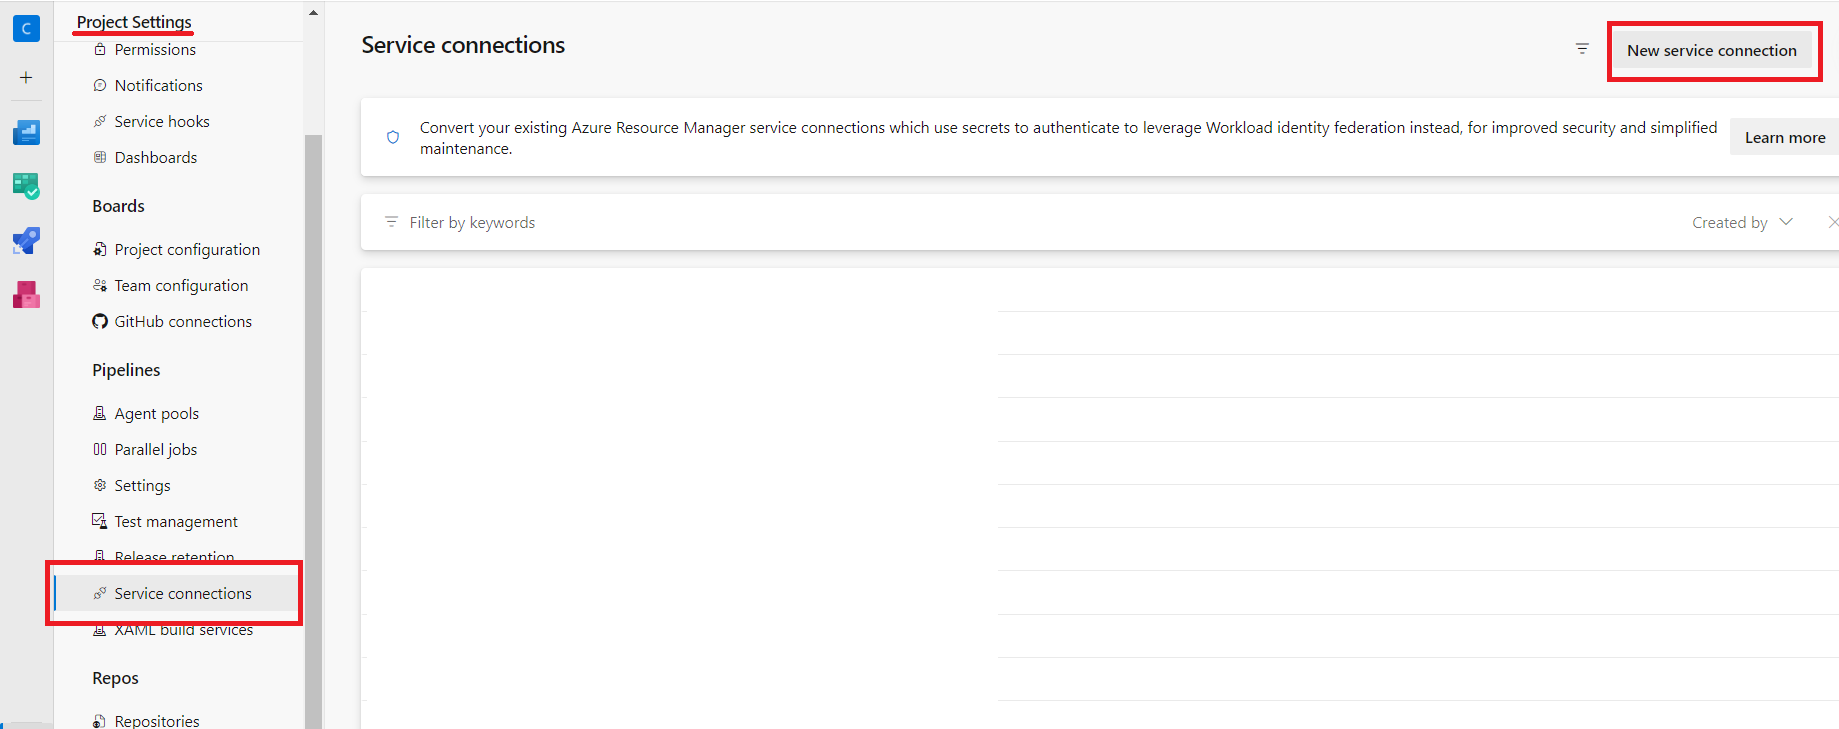
A service connection can be set up by going to the Project Settings of your project, “Service Connection” in the Pipeline section, and selecting “New Service Connection” in the top right of the page.
In the next menu, select the your source control where your repository exists and use your account to authenticate and create the service connection.
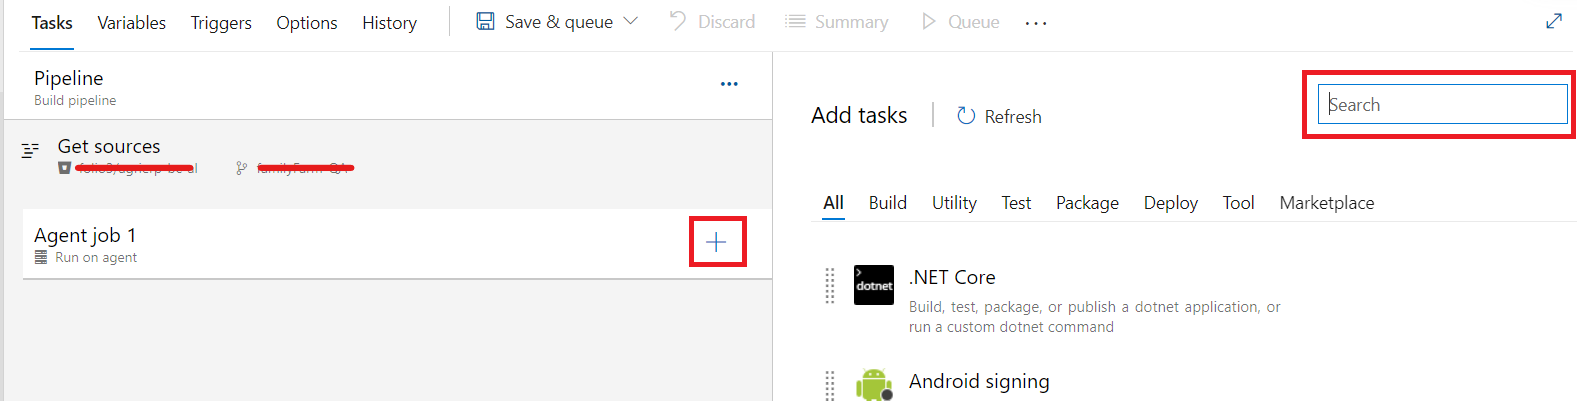
Inside the empty newly created build pipeline, we will leave the values for Agent job as default, and start adding tasks to it by clicking on the “+” button. In the search bar, type and select the “Download Package” task, twice since we will be using 2 packages from the feed, the “PowerShell” tasks, and the “Publish Pipeline Artifacts” task.
After adding the tasks, your pipeline steps would look like this. (I have renamed the “Download package” tasks)
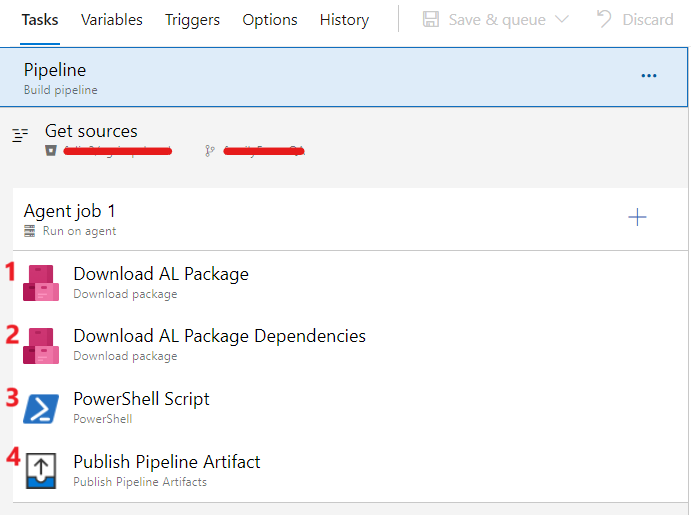
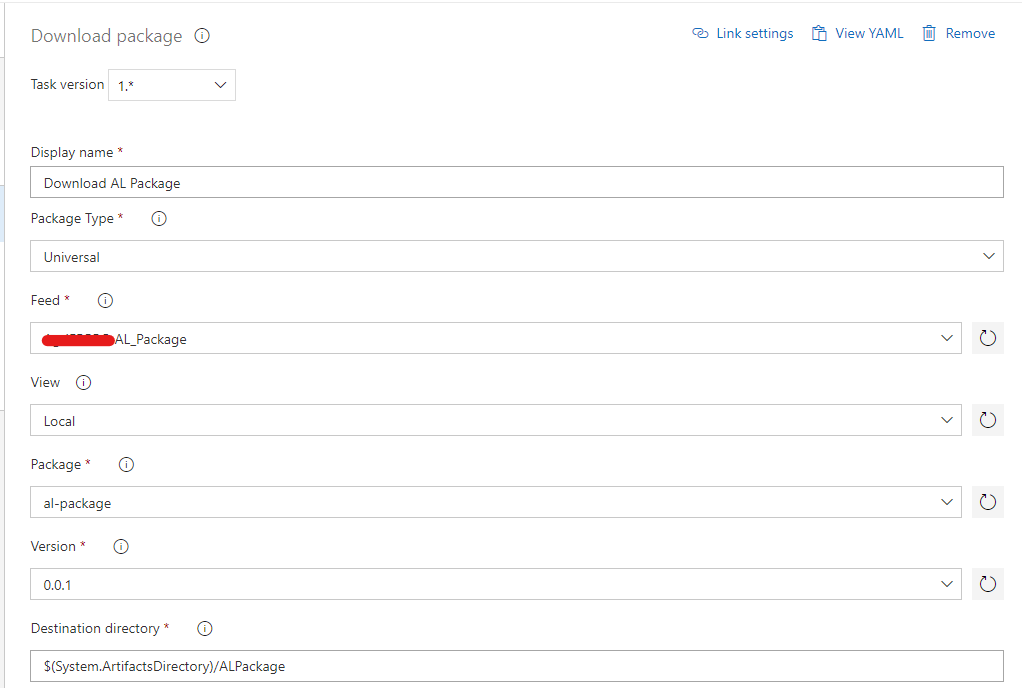
Task 1: Download AL Package
Here we will enter the details of the first package that we added, the AL Compiler. The “Destination Directory” we set here will be referenced in the later steps, make sure to include “$(System.ArtifactsDirectory)/” in the destination.
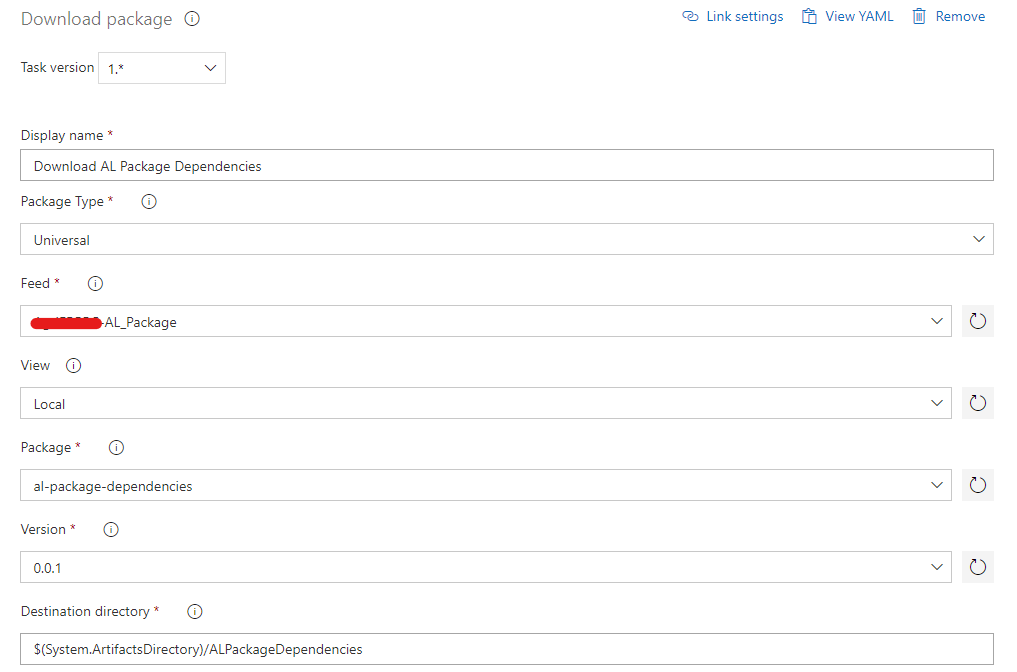
Task 2: Download AL Package Dependencies (for .alpackages folder)
In this step, we will download the dependencies package from the artifacts. Similar to the previous step, we will reference the Destination directory later on.
Task 3: PowerShell Script
In this step we will run the command in the PowerShell task to build our project.
Command: $(System.ArtifactsDirectory)/ALPackage/alc.exe /project:$(System.DefaultWorkingDirectory) /out:$(Pipeline.Workspace)/App/F3IntegerationDev.app /packagecachepath:$(System.ArtifactsDirectory)/ALPackageDependencies/
Command Breakdown:
- $(System.ArtifactsDirectory)/ALPackage/alc.exe:
The executable file from where our extension artifact was downloaded in the first step
- /project:$(System.DefaultWorkingDirectory):
The location your project files are i.e your repository. The repository files can be accessed in build pipeline using the built-in azure variable $(System.DefaultWorkingDirectory)
- /out:$(Pipeline.Workspace)/App/F3IntegerationUAT.app:
Path where the output .app file be saved, we can temporarily save it in the pipeline workspace before we publish it to pipeline artifacts in the next step
- /packagecachepath:$(System.ArtifactsDirectory)/ALPackageDependencies/:
The path to the dependencies artifacts that we uploaded to the feed.
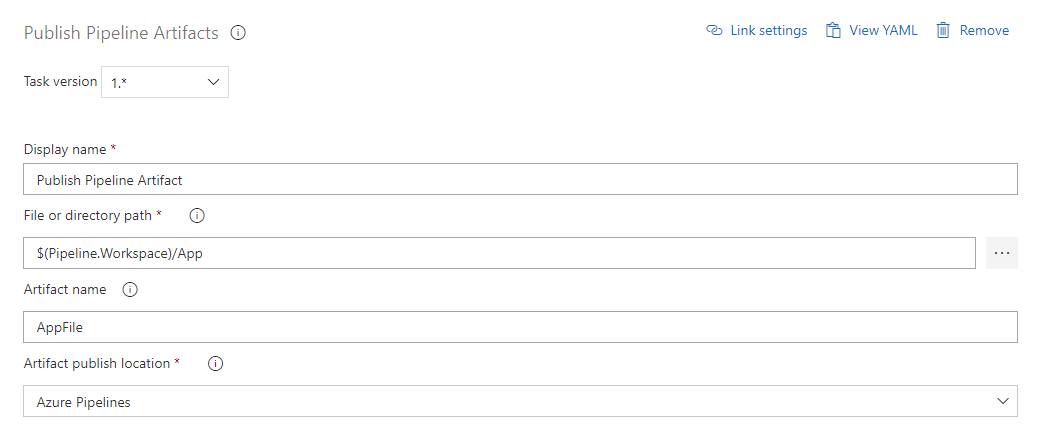
Task 4: Publish Pipeline Artifact
Now we will publish the .app file temporarily saved in the pipeline workspace to pipeline artifacts, so we can use it later in the release pipeline for deployment.
Create the pipeline and run it to test the steps, on success the output should look like this:
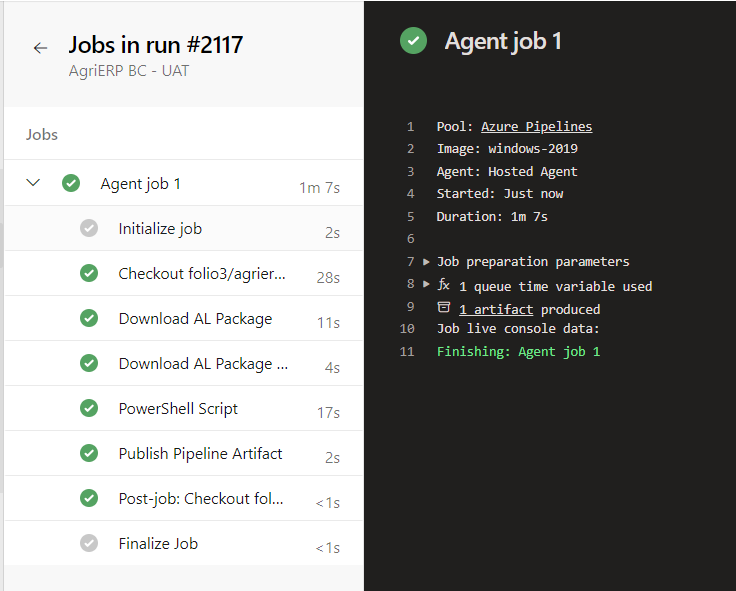
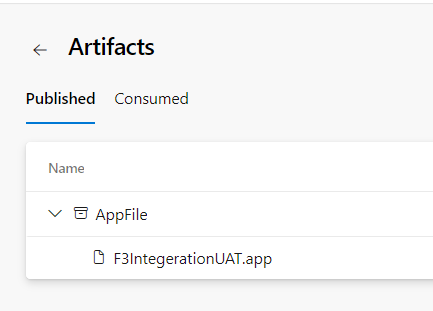
For more information, go inside the build details, and you can see published items.

In the published section, you can see the path and name of File that we published in the fourth step.
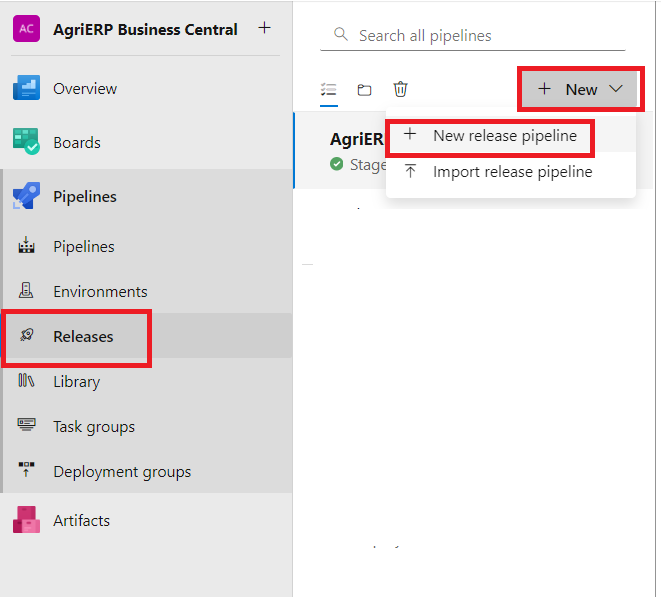
1. Release Pipeline
In this section, we will deploy our .app file to Business Central using release pipeline (CD).
On left main Menu click on “Releases” and click on “+New” -> “+New Release Pipeline”
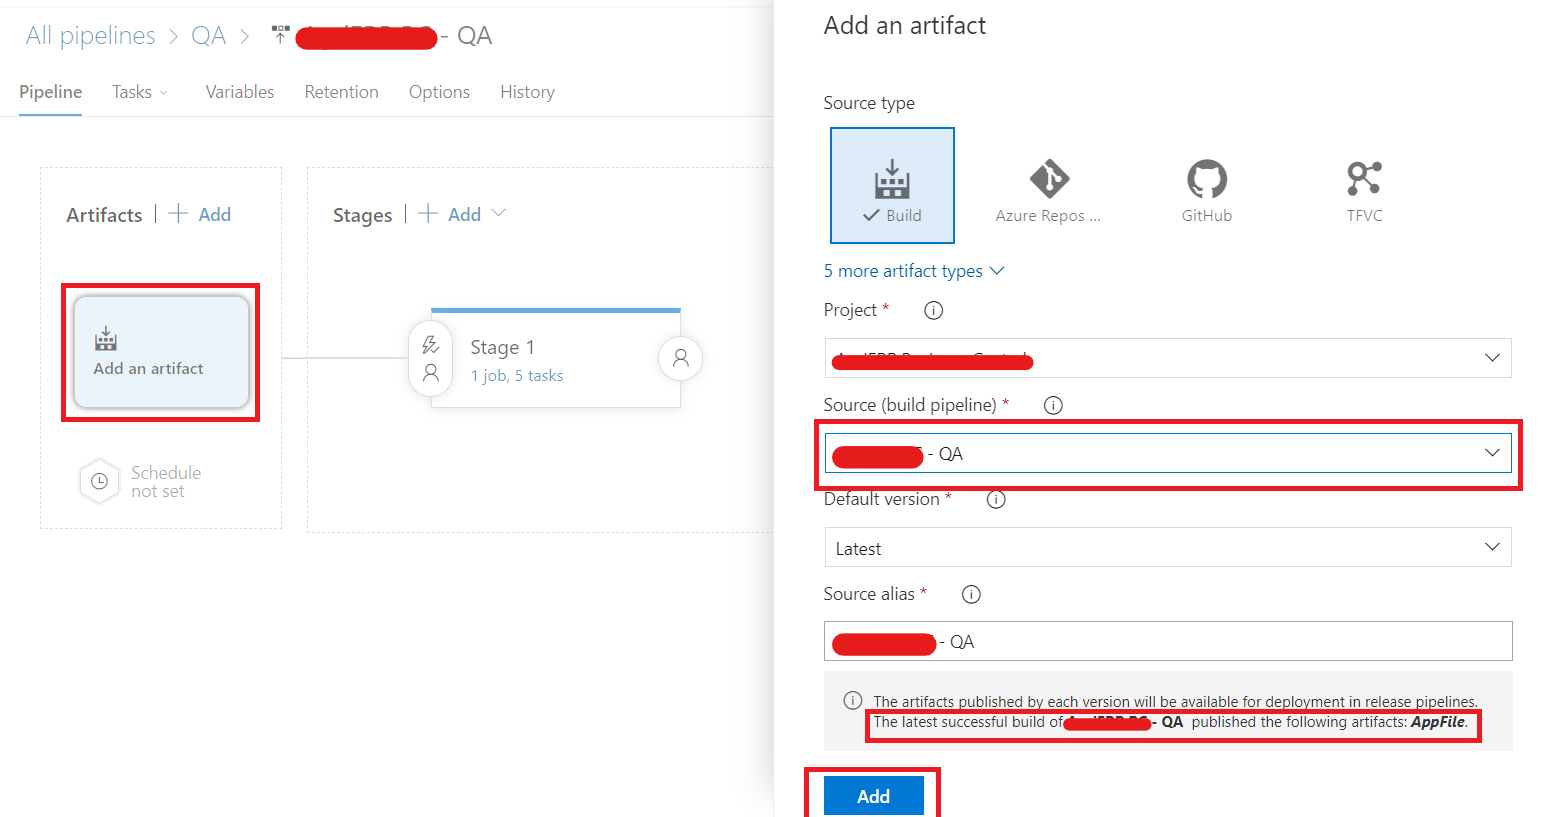
In the new release pipeline, we’ll first add an artifact, which contains the .app published in the Build Pipeline. Click on Add an Artifact, select “Build” as type of artifact, and choose the build pipeline we just created, in the “Source” dropdown. If you have run the build pipeline to produce an artifact at least once, we would be able to see the published artifact as well in the bottom message. For the “Source Alias” section, choose a name or leave it as default, we’ll use it later in the pipeline to reference the artifact.
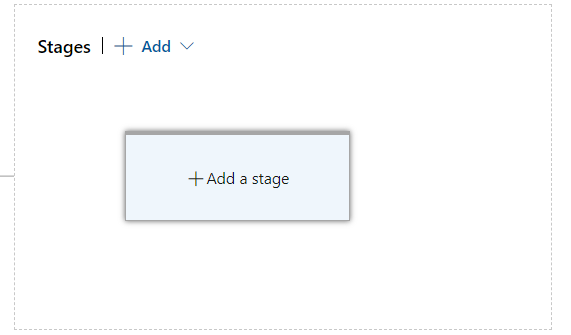
Now in the Pipeline, Add a stage and go into its tasks.
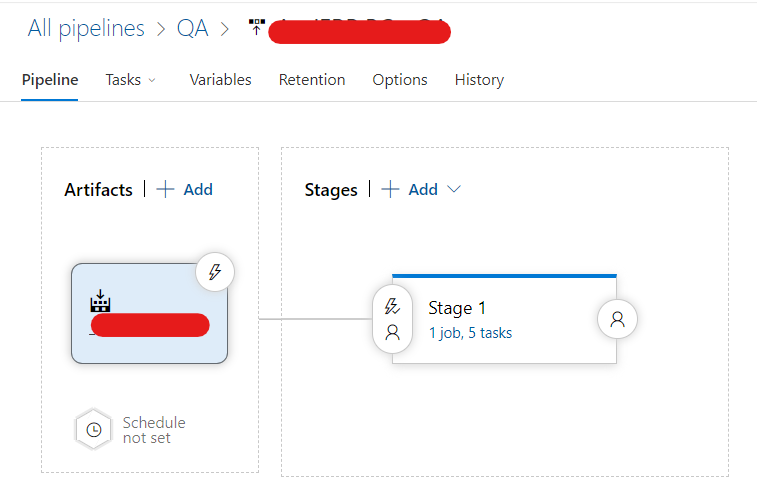
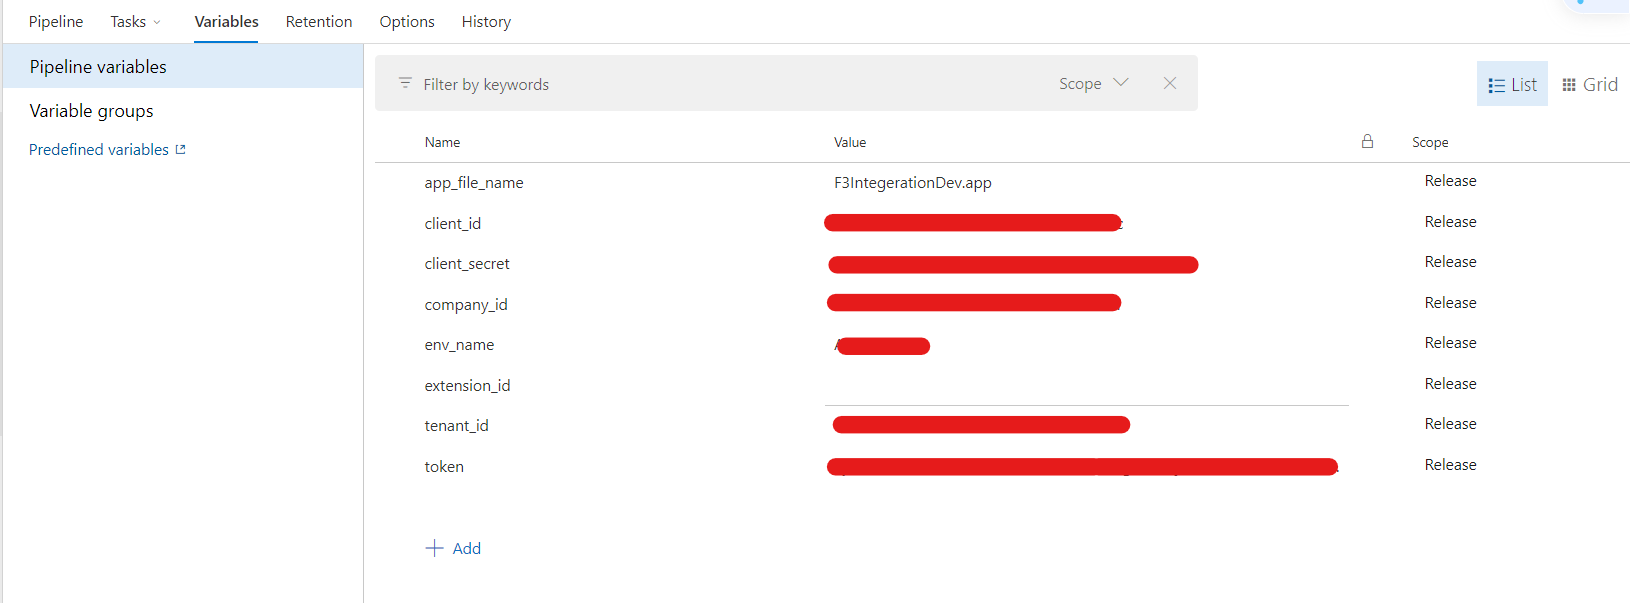
In Navigation click Variables Section, and set the following variables with your respective values.
- app_file_name => which will be the one you used in the PowerShell script “/out:$(Pipeline.Workspace)/App/F3IntegerationQA.app” of the build pipeline.
- “token” // Leave for now, this will be populated on runtime.
- “extension_id” // Leave for now, we will populate them on runtime in the upcoming release tasks.
Now in the navigation click on Tasks section, we’ll add 4 PowerShell tasks to the default agent job, running on “Windows latest” or leave it to the default agent job.
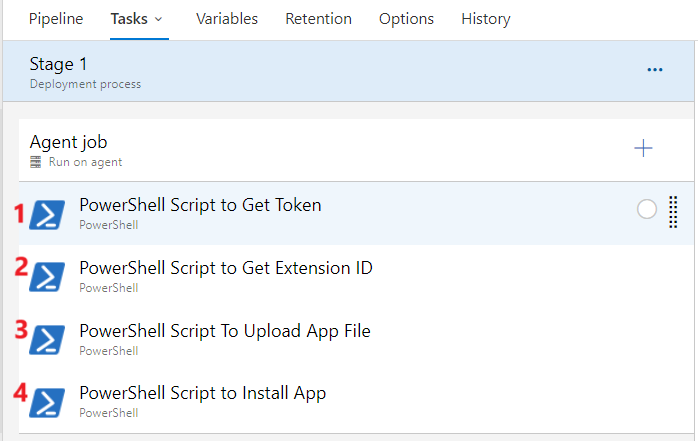
6. PowerShell Scripts for Release Pipeline Tasks.
Here, we will create PS scripts for Automation API calls. These scripts will initiate three requests to ensure the successful loading and installation of extensions into Business Central (POST, PATCH, POST). (I explained each API in Automation API for Successful Loading and Installation of Package).
- PowerShell Script to Get Token
$body = @{
                           "client_id" = "$(client_id)"
                           "client_secret" = "$(client_secret)"
                           "Scope" = https://api.businesscentral.dynamics.com/.default
                           "grant_type" = "client_credentials"

}

$response = Invoke-RestMethod -Uri "https://login.microsoftonline.com/$(tenant_id)/oauth2/v2.0/token" -Method Post -ContentType "application/x-www-form-urlencoded" -Body $body

$token = $response.access_token

Write-Host "##vso[task.setvariable variable=token]$token"  // Set the Azure Variable “token“ value
The last PowerShell command “Write-Host “##vso[task.setvariable variable=token]$token” will populate the “token” pipeline variable with the token value from the script.PowerShell Script to Get
- PowerShell to Get Extension ID
$UrlExtUpload = 'https://api.businesscentral.dynamics.com/v2.0/$(tenant_id)/$(env_name)/api/microsoft/automation/v2.0/companies($(company_id))/extensionUpload'

try {

          $headerExtensionUploadPost = @{

                    Accept ="application/json"

                    "Content-Type" =  "application/json"

                    Authorization ="Bearer $(token)"

               }

          $BodyExtensionUploadPost = @{

                     "schedule"="Current version"

                      "schemaSyncMode"="Add"

               } | ConvertTo-Json


          #Calling insert extension upload API

          $ResponseExtUploadPost = Invoke-RestMethod -Uri $UrlExtUpload -Method Post -Headers $headerExtensionUploadPost -Body $BodyExtensionUploadPost  -ContentType "application/json" -UseBasicParsing

     $extension_id = $ResponseExtUploadPost.systemId

# Set the variable

Write-Host "##vso[task.setvariable variable=extension_id]$extension_id"  // Set value of   Extensionid

 Write-Host "Get Extension Id by POST: $extension_id"

 }

 catch [System.Net.WebException] {

    $exception = $_.Exception

    $response = $exception.Response

    if ($response -ne $null -and $response.StatusCode -eq [System.Net.HttpStatusCode]::BadRequest)

        {

          Write-Host "Bad Request: The server returned a 400 status code."

            Write-Host "Calling Get ExtensionUpload API for getting extensionId."

            $headerExtensionUploadGet = @{

            Accept ="application/json"

            "Content-Type" =  "application/json"

            Authorization ="Bearer $(token)"

        }

        $ResponseExtensionUpload = Invoke-RestMethod -Uri $UrlExtUpload -Method Get -Headers $headerExtensionUploadGet  -ContentType "application/json" -UseBasicParsing

        $extension_id = $ResponseExtensionUpload.value[0].systemId

        Write-Host "##vso[task.setvariable variable=extension_id]$extension_id"

        Write-Host "Getting Extension Id by GET : $extension_id"

       } else {

        # Handle other web-related exceptions

        Write-Host "An error occurred: $($exception.Message)"

      }

 }
During this step, the Business Central Automation API’s POST call will provide a first time response with an HTTP Status of 200. The response packet includes a “systemId,” which will later serve as the “extensionUploadId” in subsequent API calls. To elaborate, the first initial step involves obtaining a token. The second call utilizes the token from the first call, acquiring “systemId” as the “extensionUploadId” in the initial attempt (where the extension_id parameter of the Release Pipeline is set). In the third step, the package is uploaded to the environment, and success is indicated by an HTTP status of 201. If this or later of any call fails, the build will also fail. Upon rerunning the pipeline, the second step will now return an HTTP status of 400 bad request, containing a response indicating that the key already exists. At this point, the same API is invoked with the GET method, now we will be retrieving the value of “extensionUploadId” from the “systemId” within the object at index 0 of “Value” json token.
Please refer to the code above in the catch section:
$extension_id = $ResponseExtensionUpload.value[0].systemId.
The PowerShell command “Write-Host “##vso[task.setvariable variable=extension_id]$extension_id ” will populate the “extension_id” pipeline variable with the extension_id value from the script.
- PowerShell Script To Upload App File
Below script will upload package file from Artifact to Business central tenant.
# Now $desiredValue contains the value you want
$UrlFileUpload = 'https://api.businesscentral.dynamics.com/v2.0/$(tenant_id)/$(env_name)/api/microsoft/automation/v2.0/companies($(company_id))/extensionUpload($(extension_id))/extensionContent'
$HeaderFileUpload = @{
Accept ="*/*"
"Content-Type" =  "application/jsonapplication/octet-stream"
Authorization ="Bearer $(token)"
"If-Match" = "*"
  }
$FilePath = "$(System.DefaultWorkingDirectory)/{{Build_Artifact_Name}}/AppFile/$(app_file_name)"
$response = Invoke-RestMethod -Uri $UrlFileUpload -Method Patch -Headers $HeaderFileUpload -ContentType "application/octet-stream" -InFile $FilePath –UseBasicParsing
- PowerShell Script to Install App
# Write your PowerShell commands here.
$UrlFileInstall = 'https://api.businesscentral.dynamics.com/v2.0/$(tenant_id)/$(env_name)/api/microsoft/automation/v2.0/companies($(company_id))/extensionUpload($(extension_id))/Microsoft.NAV.upload'
$HeaderFileInstall = @{
Accept ="*/*"
Authorization ="Bearer $(token)"
  }
Invoke-RestMethod -Uri $UrlFileInstall -Method Post -Headers $HeaderFileInstall –UseBasicParsing
Above script will use the uploaded package and install it in the environment. After all the steps are set, we will create a release for the deployment to Business Central.
Status Check of Installation.
For Status check of the app file installation on Business Central, a separate pipeline can be setup, that will give status on every run.
Create a new release pipeline like the previous one, but no artifact is required to be added since this will just be used for status check.
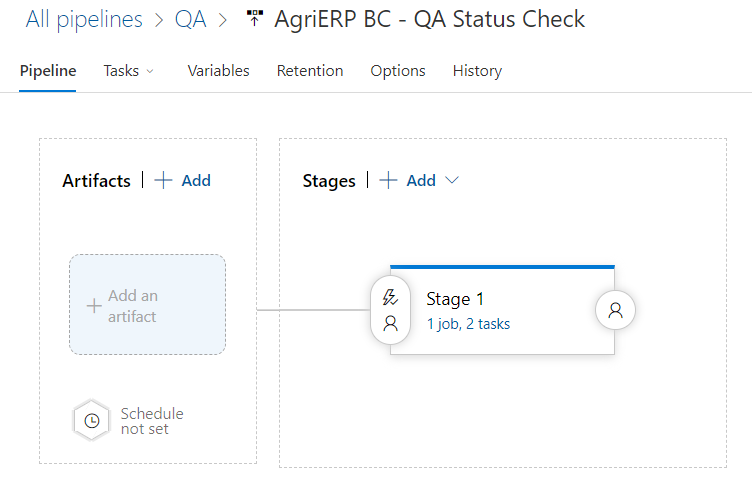
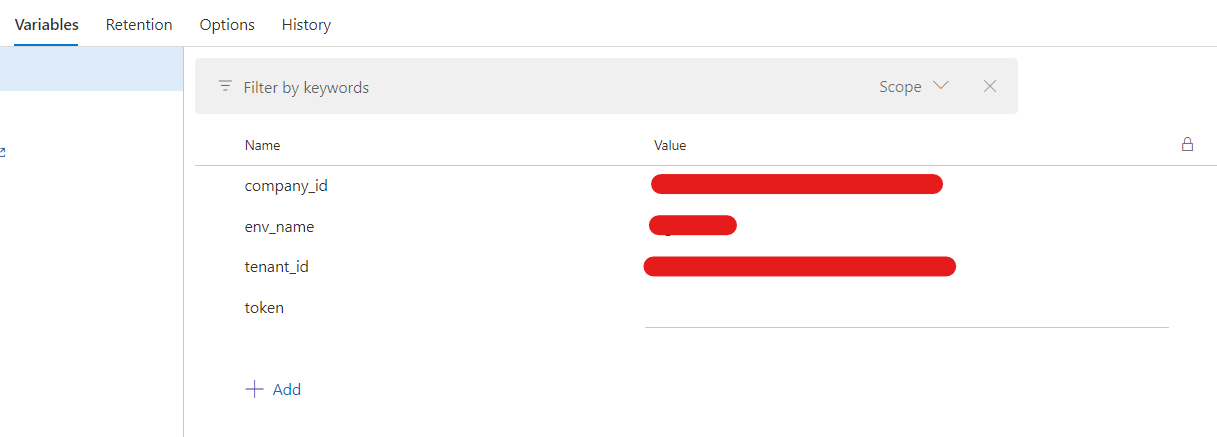
In the variables section, following variables will be added. The token variable will be left empty here as well and populated on runtime.
In the tasks section, add 2 PowerShell tasks, one to fetch the auth token (similar as previous release pipeline) and one to fetch installation status.
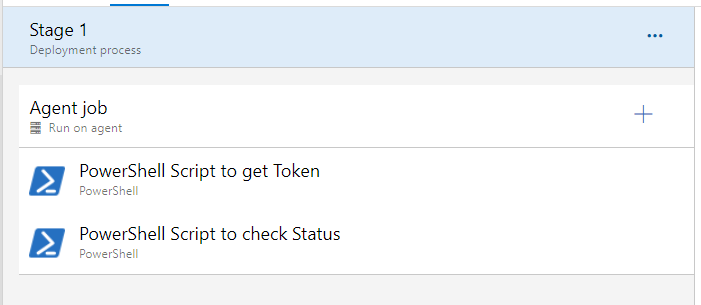
PowerShell Script to Get Token task will be the same as before.
PowerShell Script to check Status:
# Write your PowerShell commands here.
$UrlFileInstall = 'https://api.businesscentral.dynamics.com/v2.0/$(tenant_id)/$(env_name)/api/microsoft/automation/v2.0/companies($(company_id))/extensionUpload($(extension_id))/Microsoft.NAV.upload'
$HeaderFileInstall = @{
Accept ="*/*"
Authorization ="Bearer $(token)"  }
Invoke-RestMethod -Uri $UrlFileInstall -Method Post -Headers $HeaderFileInstall –UseBasicParsing


echo $response.value[0].status
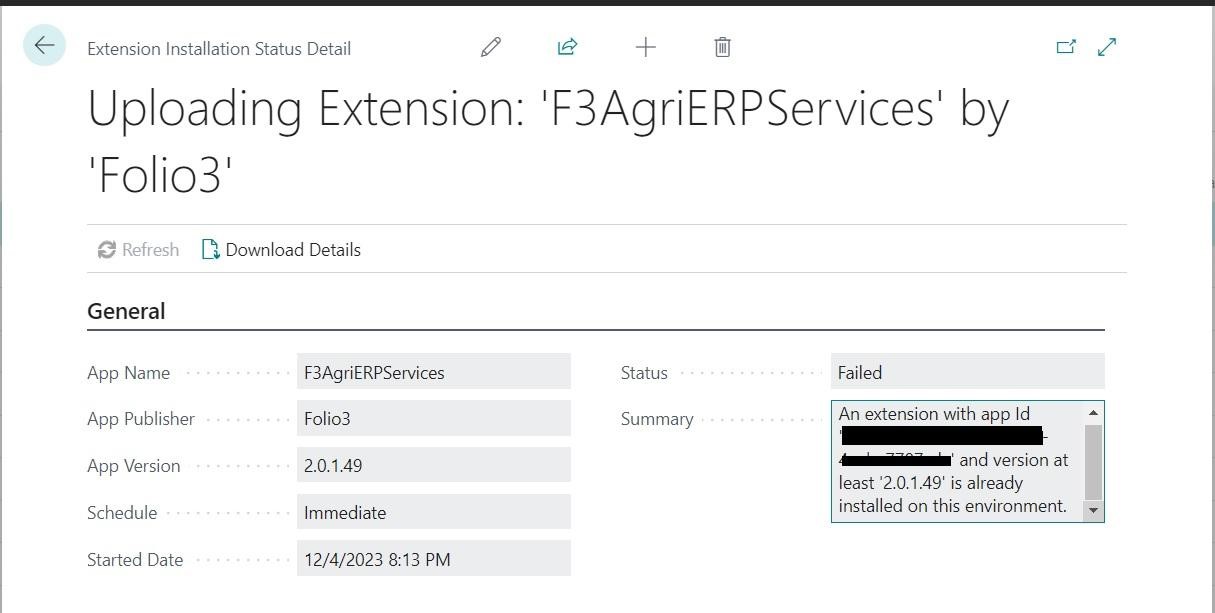
This will return a status of the installation, like so in line 12: “Failed”
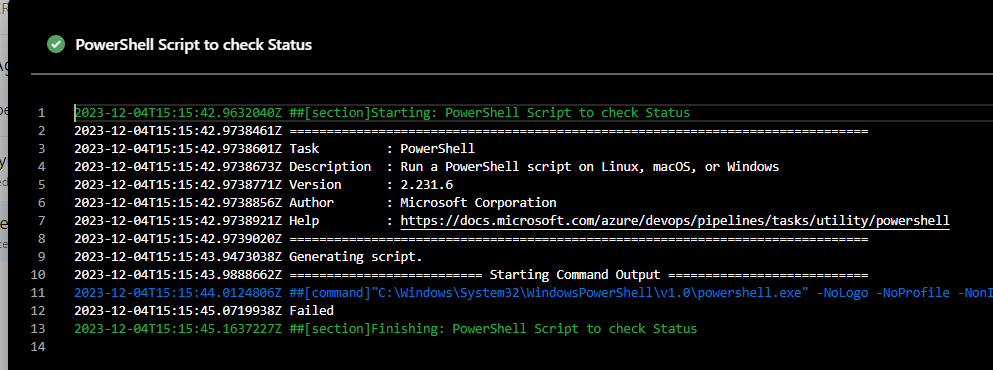
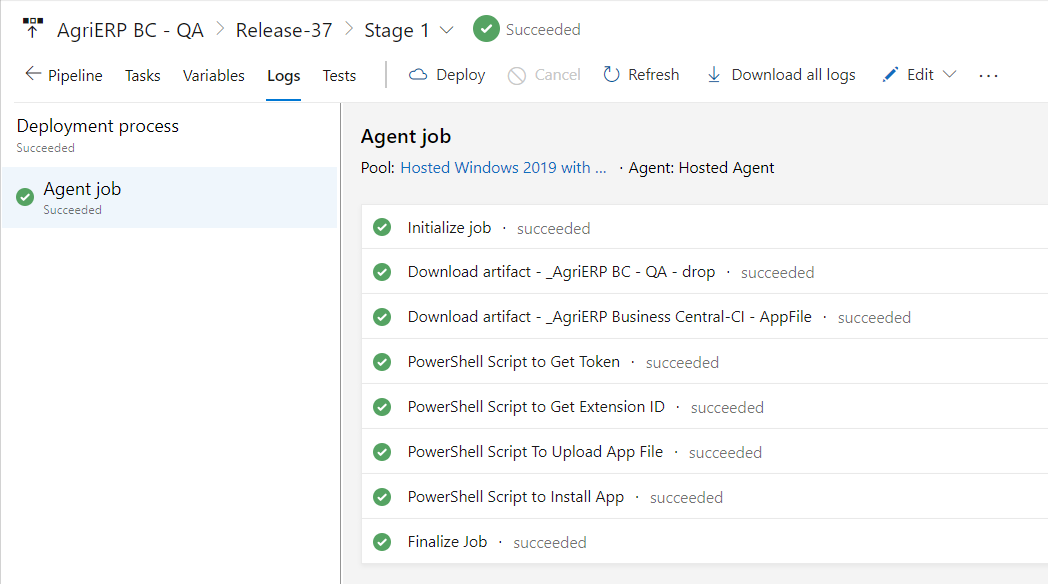
Here our release pipeline is executed successfully, the failed status is due to deploying the extension with the same version and I did this to just test the deployment successfully. Refer below screenshots.

Don’t get confused by the time difference in PowerShell script execution and environment, its UTC difference, enjoy successful execution of deployment packages using Azure DevOps CI/CD. If you have any query, reach out to us at Folio3 Dynamics or me!
Thank You!